
Kilim rugs are treasured for their vibrant geometric patterns, cultural significance, and handwoven craftsmanship. When your beloved kilim shows signs of wear like fraying edges, damaged fringes, holes, or structural instability, knowing how to repair a kilim rug becomes essential. While minor fixes may seem approachable, true restoration demands knowledge of traditional weaving techniques, fiber matching, and pattern continuity. This guide walks you through every stage of kilim rug repair, from assessing damage and choosing the right method, to understanding when professional restoration is necessary.
Assess Damage Before Repairing Your Kilim
Before any intervention, a thorough evaluation determines whether your kilim needs minor repair, full reconstruction, or professional restoration. Understanding the extent and type of damage is the critical first step that guides all subsequent decisions.
Identify Common Damage Types
Kilims suffer from several distinct damage patterns that require different repair approaches. Fraying edges, also known as selvage damage, occur when side cords unravel due to foot traffic or vacuuming. If left unchecked, this unraveling can spread into the rug body itself. Missing or broken fringes are particularly serious because fringes are not decorative but structural extensions of the warp threads. Their loss directly risks end unraveling. Holes and thinning areas typically result from moth damage, furniture pressure, or long-term wear. Small holes under two inches may be repairable, while larger damaged zones require expert reweaving. Color fading or staining happens from UV exposure or spills, especially affecting natural dyes like madder or indigo.
Determine Repair Feasibility
| Condition | Recommended Action |
|---|---|
| Minor edge wear, small holes | Repair possible with proper technique |
| Large damaged zones, multiple tears | Reconstruction required |
| Antique, heirloom, or high-value piece | Consult a professional before any work |
Warning: Incorrect repairs can permanently devalue a kilim. Never cut or remove original material without expert guidance.
Understanding When DIY Repair Works and When It Doesn’t
Kilim restoration is not simply about mending fabric. It involves preserving history, design integrity, and structural authenticity. Understanding the risks helps you make informed decisions about whether to tackle repairs yourself or call a professional.
Risks of Attempting DIY Repair
Aged wool fibers become brittle and can break under excessive tension during repair attempts. Pattern misalignment presents a major challenge because geometric motifs must align perfectly. Even a one-millimeter shift disrupts the visual rhythm that defines kilim aesthetics. Color matching proves extremely difficult since natural dyes fade unevenly across a rug, and achieving a seamless match requires access to dye archives and swatch testing. Poorly tensioned reweaving leads to puckering or sagging that becomes more visible than the original damage.
Benefits of Professional Restoration
Expert restorers use authentic materials including hand-spun wool, cotton warps, and custom vegetable dyes. They replicate traditional techniques like slit-weave, interlocking, and eccentric weaves exactly as the original weaver intended. Design continuity is maintained through negative imaging that helps reconstruct missing patterns. Proper restoration preserves or even increases both market and sentimental worth.
Essential Tools and Materials for Kilim Repair

Having the correct tools ensures precision and prevents causing further damage during repair work. Using inappropriate equipment is a common mistake that leads to irreversible problems.
Required Tools
Professional kilim repair requires specific instruments. A fine weaving needle is needed, with blunt needles for wool and sharp needles for cotton. A tension frame or loom keeps the rug taut during reweaving work. Precision scissors with small, sharp blades enable clean cuts when necessary. A bodkin or awl pulls new warp threads through tight spaces. A magnifying loupe reveals thread-level details that guide precise work. A measuring gauge matches the original thread count, which typically ranges from eight to twelve wefts per inch. Basting thread and pins mark alignment points temporarily during the repair process.
Critical Materials
Matching yarn should be sourced from hidden borders or damaged fragments of the same rug to ensure color and texture consistency. Warp thread must match the original fiber, whether cotton for strength or wool for authenticity. Side cord should be braided wool or cotton tape matching the original thickness. Organic cleaning solution that is pH-balanced and non-abrasive is essential for cleaning before and after repair.
Expert Note: Never use synthetic yarns unless absolutely necessary, and only if they match in twist, luster, and diameter. Synthetic materials stand out visually and behave differently during cleaning.
Professional Repair Process: Step-by-Step
Professionals follow a strict sequence to ensure durability, invisibility, and authenticity. Understanding this process helps you evaluate whether a restorer is following proper procedures.
Step 1: Clean Before Repair
Never repair a dirty rug because embedded grit weakens fibers and masks damage that might be revealed during cleaning. Hand-wash the rug using organic, pH-neutral cleaner, gently agitating without wringing or stretching. Rinse thoroughly and dry flat away from direct sunlight. Some studios offer live observation so clients witness the cleaning process firsthand.
Step 2: Document and Stabilize
Take high-resolution photos of the entire rug and all damaged areas before proceeding. Use negative imaging to reverse light and dark zones, which helps analyze pattern repeats and plan reconstruction. Baste loose threads to prevent further unraveling. Retain all original fragments as references for color, texture, and design matching throughout the repair.
Rewarping: Restoring Structural Integrity
Broken warps compromise the rug’s backbone. Rewarping reinstates strength by replacing damaged vertical threads that form the foundation of the weave.
When Rewarping Is Needed
This technique becomes necessary when multiple broken vertical threads exist, when end unraveling occurs due to fringe loss, or when sagging or looseness appears in central areas. These symptoms indicate structural failure that cannot be addressed through surface repairs alone.
How Professional Rewarping Works
Thread selection is critical. Restorers match fiber type, thickness, and twist to the original warp. Using a bodkin, they pull new warp through the selvage or damaged zone. The warp is secured on a frame with tension adjusted daily to match original specifications. Finally, the warp is knotted firmly at both ends and blended into the original weave.
Expert Insight: Live rewarping, which involves adjusting tension incrementally over time, prevents distortion in aged fibers that are prone to breaking under sudden stress.
Reweaving: Fixing Holes and Worn Areas
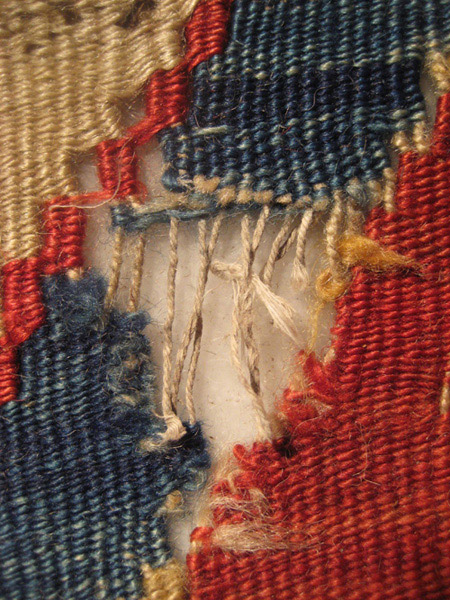
Reweaving fills missing sections using original weaving techniques to create repairs that are virtually invisible. This is the most technically demanding aspect of kilim repair.
Choosing the Right Technique
Slit-weave technique works for sharp geometric color blocks and creates the small slits between colors that define traditional kilim construction. Interlocking technique provides smoother transitions where threads loop around shared warps. Eccentric weft technique handles curvilinear designs where the weft wraps around non-adjacent warps.
The Reweaving Process
Yarn sourcing uses wool salvaged from non-visible areas like hidden borders. Pattern alignment requires matching motif repeat using negative image analysis. Row-by-row weaving inserts wefts manually with a fine needle, building up the repair incrementally. Edge blending tapers new yarn into surrounding fabric for a seamless finish that passes inspection from three feet away under normal lighting.
Fringe and Edge Repair Techniques
Fringe damage is extremely common, but replacing it incorrectly destroys authenticity. Side cord repair, known as selvage repair, protects the rug’s perimeter and prevents cascading damage.
Fringe Repair Options
Reweaving reconstructs fringe by hand using the original knotting style such as overhand knots or plaits. Securing involves trimming and hemming loose ends to stop unraveling without full replacement. Replacement attaches new fringe with matching yarn and traditional plaiting methods. Matching the original style is critical because Turkish kilims often feature twisted or braided wool fringe while Persian-style kilims may have knotted or tasseled ends, and Anatolian pieces frequently use three-strand plaits.
Warning: Avoid gluing or sewing fringe because this creates stress points that accelerate failure. Traditional knotting methods distribute tension properly.
Selvage Repair Methods
Reattach side cords by weaving new cotton or wool tape into edge wefts. Re-bind using selvage strips handwoven to match original weave density. Reinforce tension by mounting on a frame to ensure even pull across the entire edge.
Full Restoration for Severe Damage
When multiple systems fail simultaneously, full restoration may be the only option to save a severely damaged kilim.
When Full Restoration Becomes Necessary
This comprehensive approach becomes necessary with extensive moth damage, large areas of missing weave exceeding fifty square centimeters, flood or fire damage, or pet damage. Previous poor repairs causing distortion may also necessitate full reconstruction to undo earlier mistakes.
What Full Restoration Includes
Complete reweaving of all damaged zones addresses both visible holes and underlying structural problems. Color retouching is only performed if reversible and historically accurate. Structural reinforcement, using invisible backing, is rarely needed but available when essential. Final cleaning and finishing prepare the restored piece for return to service.
Common Challenges in Kilim Restoration
Even experienced professionals face hurdles that demand patience and precision. Understanding these challenges helps you appreciate why professional restoration takes time and costs what it does.
Color Matching Difficulties
Natural dyes fade unevenly across the rug, creating a complex pattern of color variation. New wool initially appears brighter but mellows naturally over time. Professional restorers solve this by dyeing custom batches using traditional sources like madder, indigo, or weld, and testing on swatches before application.
Pattern Continuity Issues
Misaligned motifs break the visual rhythm that makes kilims visually striking. Digital negative imaging reverses the design to reconstruct missing sections accurately. This technique allows restorers to see the original pattern and rebuild it precisely.
Tension Control Problems
Too much tension causes puckering while too little creates sagging. Professional practice involves checking alignment daily and adjusting incrementally throughout the repair process. This ongoing attention distinguishes professional work from amateur attempts.
Finding a Trusted Restoration Professional
Choosing the right expert ensures your kilim receives care matching its value and significance. Not all rug repair services understand the unique requirements of flatwoven kilims.
What to Look For in a Restorer
Seek experience specifically with kilims rather than general rug repair. Verify use of traditional materials and techniques. Expect transparency including photo updates and client observation opportunities. Choose services offering free assessment and quote before committing to any work.
Recommended Services
Rug Store in London has been family-run since 1979, offering generational expertise in fringe repair, reweaving, resizing, and organic cleaning. They use hand-spun wool and custom vegetable dyes. Contact them at 020 8876 0070, located at 312 Upper Richmond Road West, SW14 7JN.
Rug Expo brings over twenty years specializing in kilim and oriental rug restoration, offering feasibility assessments and reconstruction. They advise replacement if restoration is not economically viable.
Rug Repairs operates with an open-door policy allowing clients to watch the process. They specialize in fringe, selvedge, and hole repair across Persian, Turkish, Afghan, and Berber rugs.
Preventing Future Damage to Your Kilim
Proper care extends your kilim’s life and reduces the need for future repairs. Investing in prevention costs far less than restoration.
Daily and Monthly Care
Vacuum weekly using no beater bar, suctioning along the length of the rug rather than against the weave. Rotate the rug every six to twelve months to distribute wear evenly across all areas. Spot clean spills immediately using mild soap and cold water, always blotting rather than rubbing the affected area.
Long-Term Protection
Use UV-blocking window film to prevent fading from sunlight exposure. Avoid placing kilims in direct sunlight or damp basements. Place non-slip, breathable pads under furniture legs and beneath the entire rug to prevent movement and reduce stress on edges.
Safe Storage Practices
Roll the rug around a wide cardboard or PVC tube with a minimum six-inch diameter. Wrap in cotton cloth, never plastic which traps moisture and encourages moth activity. Store in a dry, dark, pest-free area, and consider placing cedar blocks or lavender sachets nearby to deter moths.
Key Takeaways for Kilim Owners
Your kilim is more than a floor covering. It represents a piece of textile heritage deserving respect and proper care.
Essential Guidelines
Inspect your rug regularly for early signs of wear including loose threads, thinning areas, or color changes. Clean professionally every three to five years rather than attempting harsh DIY cleaning. Never attempt DIY repairs on antiques or valuable pieces where mistakes cost more than professional services. Choose restorers who use traditional methods and authentic materials. Preserve original fragments because they are vital references for any future repairs.
For Aspiring Restorers
Start with low-value, modern kilims to practice techniques before attempting work on valuable pieces. Study Anatolian weaving techniques and plain weave fundamentals through books and workshops. Join communities like Turkotek forums for feedback and continued learning. Document every step of your work because the process itself becomes part of the craft tradition.
Frequently Asked Questions About Kilim Rug Repair
Can I repair a kilim rug myself?
DIY repair is generally not advisable for valuable or antique kilims. While minor fixes like securing loose fringe ends on low-value modern pieces may be acceptable, most repairs require expertise in weaving techniques, fiber matching, and pattern alignment. Incorrect DIY repairs can permanently devalue your rug and make professional restoration more difficult.
How much does professional kilim repair cost in the UK?
Costs vary significantly based on damage extent. Fringe repair ranges from fifty to three hundred pounds. Small hole reweaving typically costs one hundred to two hundred pounds. Large area reconstruction runs four hundred to over one thousand pounds. Full restoration of antique kilims can cost one thousand five hundred to five thousand pounds or more.
How long does kilim restoration take?
The timeline depends on damage severity and the restorer’s workload. Minor repairs may take two to four weeks. Full reconstruction can require two to three months. Always ask for a realistic timeline during the assessment phase.
What is the difference between a kilim and a Persian rug?
Kilims are flatwoven using a weft-faced plain weave where colored weft threads completely cover the warp threads. Persian rugs are pile rugs with knots that create a textured surface. This fundamental construction difference means repair techniques differ significantly between the two types.
How do I know if my kilim needs repair or replacement?
Small holes under two inches and minor edge wear typically allow repair. Large damaged zones exceeding fifty square centimeters, extensive moth damage, or structural failure may require reconstruction. For antique or high-value pieces, always obtain professional assessment before deciding.
Can moth damage on a kilim be repaired?
Yes, moth damage creating holes or thin areas can be repaired through reweaving. The extent of damage determines whether simple patching suffices or full reconstruction becomes necessary. Professional restorers match yarn from hidden areas to maintain authenticity.
Final Thoughts on Repairing Your Kilim Rug
Repairing a kilim rug successfully requires balancing technical skill with respect for the original craftsmanship. The most important principle is thinking carefully before making any irreversible decisions because cutting original material cannot be undone. A well-executed repair should honor the weaver’s original intent, remaining invisible, durable, and true to tradition. Whether you choose professional restoration or decide the damage is minor enough for careful DIY attention, your attention to proper technique ensures your kilim continues telling its story for generations to come.







