
You don’t need expensive materials or advanced skills to create a stylish, durable rug from old clothes. Learning how to make a cloth rug is one of the most rewarding DIY projects you can tackle. Whether you’re upcycling worn-out T-shirts, repurposing denim jeans, or crafting a wipeable kitchen mat from fabric and vinyl, handmade cloth rugs save money, reduce waste, and add unique charm to any space.
Most methods cost under $20 and are beginner-friendly. You can customize size, shape, color, and texture to match your room’s style. From soft braided bedroom rugs to absorbent bath mats and durable entryway floor covers, there’s a technique for every skill level and purpose. This guide covers 11 proven methods with step-by-step instructions, materials lists, and expert tips to help you succeed.
Choose Your Cloth Rug Method
Not all fabric rugs are made the same. The best method depends on your available materials, tools, time, and desired durability. Here’s a quick overview of the top techniques ranked by ease and use case.
Match Method to Your Needs
• Soft nursery rug works best with sweater glue-on or finger crochet methods
• Kitchen or mudroom needs a vinyl-backed sealed rug
• Bathroom mat benefits from shag towel or finger crochet construction
• Living room centerpiece suits jelly roll spiral or braided denim
• Quick weekend project try no-sew braid or hula hoop weave
Each method uses recycled textiles, turning old clothes into functional art. Let’s dive into each technique with clear, actionable steps.
Sew a Jelly Roll Spiral Rug
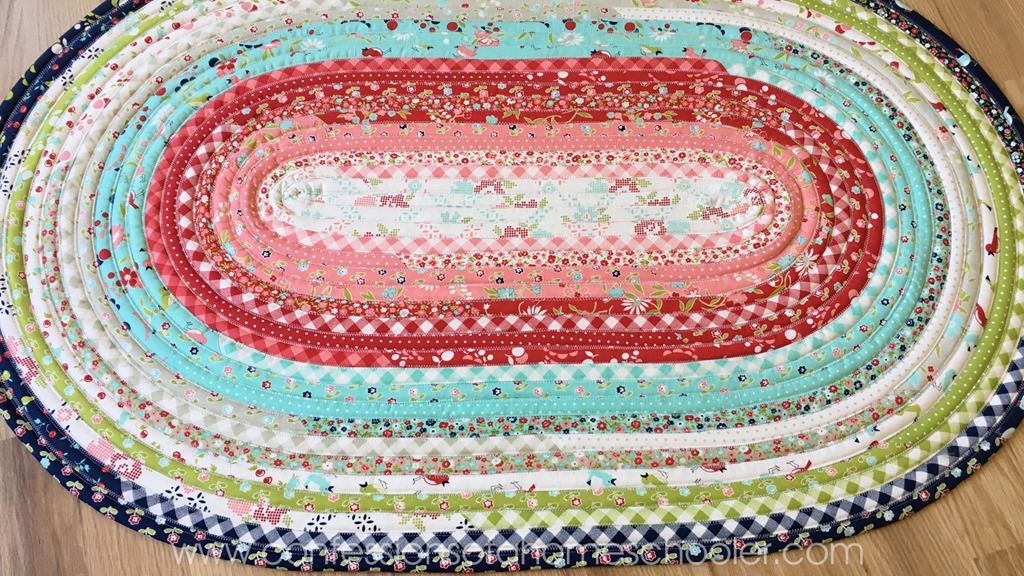
Ideal for quilters or crafters with basic sewing skills, this polished rug uses pre-cut fabric strips for a professional look that costs under $30 in materials.
Gather Your Supplies
• One jelly roll (40 plus 2.5 inch by 44 inch quilting cotton strips)
• 2.5 inch wide batting roll
• Sewing machine with zigzag stitch capability
• Walking foot and denim needle (size 90/14)
• 50-weight cotton thread
• Iron and Best Press spray
• Wonder clips
Join and Press Strips
Arrange fabric strips in your preferred color order. Sew them end-to-end with a quarter-inch seam, right sides together. For smoother joins, use mitered corners by placing strips diagonally and sewing corner-to-corner, then flipping and trimming excess. Press all seams open with steam for a flat, wrinkle-free strip.
Attach Batting
Lay one fabric strip right side up. Center a batting strip on top. Fold the fabric over the batting and press to crease. Unfold, then place the next fabric strip face down on the raw edge. Sew with a quarter-inch seam, press open, and repeat. This creates a continuous fabric-batting sandwich ready for coiling.
Coil and Sew the Spiral
Begin coiling from one end into a tight spiral. Use wonder clips to hold layers in place. Attach a walking foot to your machine to prevent fabric shifting. Sew through all layers using a wide zigzag stitch (width 4.0, length 1.0) for flexibility and strength. Reinforce the outer edge with a second pass for durability.
Finish Cleanly
Tuck the final raw ends under and hand-stitch closed. Lightly spray with Best Press to smooth any wrinkles. This rug measures approximately 30 inches by 44 inches, perfect for beside a bed or under a coffee table.
Pro Tip: Use coordinated fabric lines (like Jen Kingwell’s collections) for a designer look that appears store-bought.
Braid a No-Sew T-Shirt Rag Rug
No machine? No problem. This method turns old T-shirts into a soft, stretchy rug using only your hands and takes 3-6 hours to complete.
Cut T-Shirt Yarn
Lay a T-shirt flat. Cut off sleeves and bottom hem. Slice horizontally into 1.5-3 inch rings. Stretch each ring—it will curl into a continuous loop. Repeat until you have three long strands ready for braiding.
Braid and Coil
Start braiding the three strands tightly. After 2-3 inches, lay the braid in a tight spiral. Use the innermost strand threaded through a tapestry needle to weave through the previous coil every few inches. This locks the braid in place and prevents unraveling.
Add New Strips
When a strand ends, use the overlap method: lay the new strip over the old one for 3-4 inches and continue braiding. Or use the hole method: fold the end of the old strip, cut a small slit, thread the new strip through the hole and over the old piece, then pull tight.
Secure the End
Taper the last 3-4 inches of each strand. Thread them under the rug with a needle and knot securely. Tuck ends neatly for a clean finish.
Time: 3-6 hours
Skill Level: Beginner
Best For: Bedrooms and kids’ rooms
Caution: If not woven tightly, the braid may loosen over time. Check your tension regularly.
Make a Mixed-Fabric Braided Rug
Upgrade from T-shirts by blending cotton, flannel, denim, and silk into a textured, artistic rug with visual depth that single-fabric rugs cannot achieve.
Prepare Fabric Strips
Cut scraps into 1-2 inch wide strips. Mix colors and textures for visual interest. Join strips end-to-end with strong knots or hand stitches—avoid sewing machine seams, which can weaken under tension and create bulky joints.
Braid with Consistent Tension
Braid tightly to prevent sagging. Use three strands of similar thickness. If one fabric is stretchier (like jersey), pair it with a stiffer one (like cotton denim) to balance tension and keep your braid even throughout.
Coil and Sew
Once the braid reaches your desired length (up to 30 plus feet for a 3-foot rug), coil it into a circle or oval. Hand-sew coils together using a backstitch or whip stitch with heavy-duty thread. Reinforce every few inches to ensure the rug holds together underfoot.
Challenge: Mixed fabrics can pull unevenly. Work slowly and adjust tension as needed to maintain a flat, even rug.
Finger Crochet a T-Shirt Yarn Rug
No hooks, no machine—just your fingers and T-shirt yarn create a soft, absorbent rug perfect for bathrooms and nurseries.
Create the Yarn
Cut T-shirts into 1.5-2 inch rings. Stretch into long loops. Join pieces by stretching and tying or overlapping and sewing securely. This creates continuous yarn that feeds smoothly through your fingers.
Start Crocheting
Place the yarn end between your index and middle fingers. Pull a new loop through the first. Continue pulling loops through—this is a finger chain stitch. For a circular rug, work in rounds, increasing stitches slightly to prevent curling and maintain flatness.
Shape and Finish
Keep tension even throughout. For a bath mat, work in straight rows. For a round rug, increase 6-8 stitches per round. End by cutting the yarn, pulling it through the last loop, and weaving the tail under nearby stitches to secure.
Time: 4-8 hours
Best For: Bathrooms and nurseries
Care: Machine wash gentle, air dry
Pro Tip: Use dark or patterned shirts to hide wear and stains over time.
Weave a Rag Rug on a Hula Hoop
Turn an old hula hoop into a loom for a fun, structured weaving project that produces a charming small rug or wall hanging.
Set Up the Loom
Use a standard adult plastic hula hoop. Cut fabric into long, even strips (1-2 inches wide). Tie one end of a strip to the hoop, then stretch it across to the opposite side and tie again. Repeat around the hoop for 15-20 vertical warp threads.
Weave the Rug
Cut more strips for the weft (horizontal threads). Weave over and under the warp threads. Pack each row tightly with your fingers or a weaving comb. Alternate the over-under pattern with each row to create a stable, tight weave.
Remove and Finish
When the hoop is full, cut the warp threads on one side. Slide the rug off. Sew the edges together to close the circle. Trim fringe evenly for a polished look.
Time: 5-7 hours
Skill Level: Beginner
Best For: Small decorative rugs or wall art
Craft a Denim Rag Rug with Yarn Accents
Give old jeans new life with colorful yarn inlays for a bold, artistic look that adds personality to any room.
Cut and Braid Denim
Cut denim into 1.5-2 inch strips. Join with knots or stitches. Braid tightly. You can also spiral-sew the braid like a jelly roll rug for extra durability in high-traffic areas.
Add Yarn Inlays
Every few inches, weave in a bright cotton yarn strand between braid layers. Or use yarn as decorative stitching when sewing coils together for added visual interest and color pops.
Seal for Durability
For high-traffic areas, apply 2-3 coats of fabric stiffener or seal with diluted PVA glue. Let dry completely between coats to prevent tackiness.
Sustainability Win: This method accomplishes double upcycling—denim plus leftover yarn that might otherwise be discarded.
Glue a Fuzzy Sweater Rag Rug
Create a super-soft rug using old sweaters and foam play mats with no sewing required. This method takes just 2-3 hours from start to finish.
Gather Materials
• Old wool or acrylic sweaters
• Interlocking foam play mat (about $10)
• Scissors
• Spray adhesive or fabric glue
• Duck Brand duct tape
Cut and Arrange
Cut sweaters into squares, rectangles, or organic shapes. Arrange on the foam mat for a patchwork or gradient look. Overlap slightly for full coverage without gaps.
Adhere and Reinforce
Spray adhesive on the back of each piece and top of foam. Press firmly and hold for 30 seconds. Let dry 24 hours. Flip and reinforce the back with duct tape to prevent peeling during use.
Texture: Extremely plush and comfortable
Best For: Nurseries, pet beds, and reading nooks
Care: Spot clean only—this method is not machine washable
Make a Fabric Twine Spiral Rug
Turn any scrap fabric into twine, then machine-sew it into a durable spiral rug perfect for bath mats and entryways.
Create Fabric Twine
Cut fabric into a continuous spiral (1-2 inches wide). Stretch each section—it will curl into twine naturally. Roll into a ball for easy feeding through your sewing machine.
Coil and Sew
Start coiling from the center outward. Use a zigzag stitch to sew each new layer to the previous one. Keep tension steady to avoid puckering and maintain an even, flat surface.
Design Tip: Dye or paint fabric before twining for custom colors that match your decor perfectly.
Best For: Bath mats and entryways
Time: 5-8 hours
Skill Level: Intermediate
Build a Pom-Pom Rag Rug on Underlay
Thread fluffy pom-poms through a mesh mat for a playful, textured rug that adds whimsy to kids’ rooms.
Make Pom-Poms
Use a pom-pom maker or cardboard template. Wrap yarn or fabric twine tightly around the template. Tie center securely, cut loops, then trim into a round shape.
Attach to Rug Mat
Use a tapestry needle or latch hook to pull the pom-pom’s tie-end through a hole in a rubber mesh underlay. Pull tight so the pom-pom sits on top. Repeat densely for full coverage.
Adaptation: Use fabric twine pom-poms instead of yarn for a rag rug twist that matches other textiles in your home.
Best For: Kids’ rooms and accent rugs
Make a Shag Rag Rug from Old Towels
Create a highly absorbent bath mat using terry cloth and a non-slip backing that performs better than many store-bought options.
Cut Towel Strips
Cut old towels into 1×6 inch strips. Fold each in half to create doubled thickness for better absorbency and durability.
Use a Latch Hook
Pull the folded end through a hole in a mesh rug underlay. Pull the loose ends through the loop and tighten—this creates a knotless fringe that won’t unravel. Repeat until the mat is fully covered. Trim for even pile height.
Performance: Super absorbent, machine washable, and excellent grip on tile and hardwood floors
Drawback: Time-consuming at 6-10 hours of work
Best For: Showers and beside bathtubs
Create a Custom Vinyl-Backed Rug
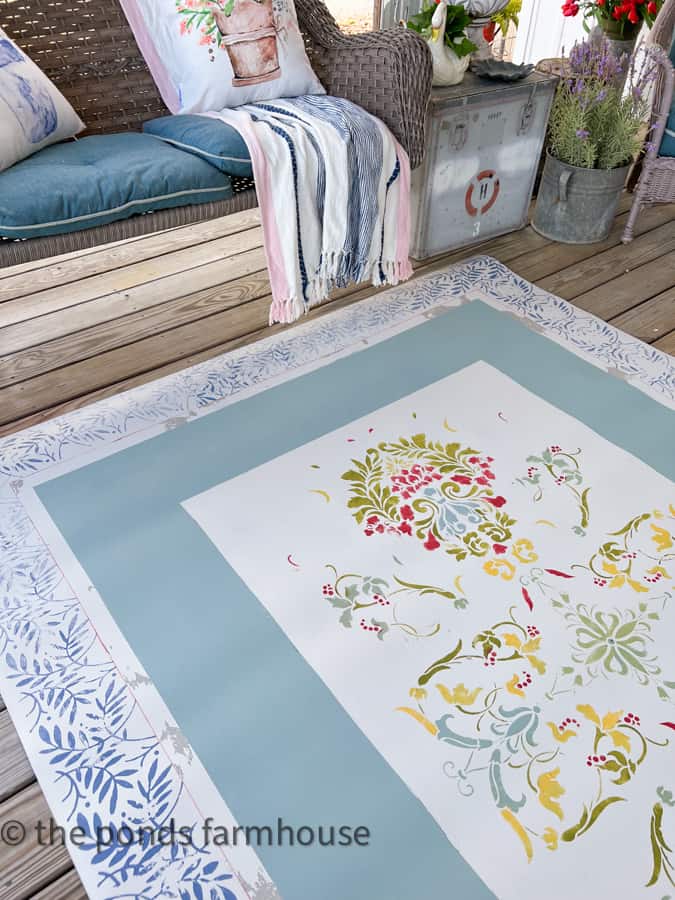
Make a wipeable, custom-designed rug perfect for kitchens and entryways that can handle spills and heavy foot traffic.
Gather Supplies
• Vinyl flooring remnant (24×36 inches)
• Fabric with 3 inches extra on all sides
• Spray glue
• Water-based polyurethane (5 plus coats)
• Duck Brand duct tape
• Stiff-bristle brush
Prepare and Glue
Cut vinyl to your desired size. If using light fabric, prime with white spray paint first. Spray glue on the back of fabric and top of vinyl. Center fabric, then smooth from center outward to avoid bubbles and wrinkles.
Seal and Reinforce
Apply first 2 coats of polyurethane, brushing from center out. Once dry, fold excess fabric over the back and glue securely. Reinforce edges with duct tape. Apply 3 more coats of polyurethane on top for a durable, wipe-clean surface.
Result: A spill-proof surface that wipes clean with a damp cloth
Drying Time: 24-48 hours total
Total Active Time: About 3 hours
Troubleshoot Common Rug Problems
Even experienced crafters face issues. Here’s how to fix them fast when problems arise during or after construction.
Rug Curls at Edges
Cause: Uneven tension during sewing or coiling creates ripple effects.
Fix: Steam press every 2-3 rounds during construction. Use a flat work surface and maintain consistent tension throughout.
Sewing Machine Jams
Cause: Coiled strip fed in the wrong direction (outward instead of inward).
Fix: Keep the free end pointing toward the machine’s interior and feed slowly through the presser foot.
Thread Keeps Breaking
Cause: Thick fabric layers strain the needle and stress the thread.
Fix: Use a denim needle (size 100/16) and loosen upper tension on your machine to accommodate thick seams.
Polyurethane Bubbles
Cause: Air trapped under fabric or in the sealant itself.
Fix: Brush polyurethane from center to edges with a stiff brush, working out air pockets as you go.
Rug Slips on Floor
Cause: Smooth backing provides no friction against flooring.
Fix: Add non-slip tape to the bottom or place on a rubber rug pad designed for carpet overlay.
Fabric Shrinks After Sealing
Cause: Too much polyurethane pulls fibers inward during drying.
Fix: Cut fabric 3-4 inches larger than the base to allow for shrinkage during the sealing process.
Maintain and Clean Your Cloth Rug
Proper care extends your rug’s life for years and keeps it looking its best in your home.
Cleaning by Method
• Sewn fabric rugs: Machine wash on gentle cycle, air dry flat
• Braided rugs: Hand wash or spot clean to protect the weave structure
• Glue-based rugs: Spot clean only—avoid soaking, which destroys the adhesive
• Vinyl-backed rugs: Wipe with damp cloth and mild soap as needed
• Shag and towel rugs: Machine wash if the underlay allows; check manufacturer guidelines
Prevent Premature Wear
• Rotate high-traffic rugs monthly to distribute wear evenly
• Vacuum low-pile rugs weekly to remove dirt before it embeds in fibers
• Avoid direct sunlight exposure to prevent fading and fiber degradation
Key Takeaways for Making Your Own Cloth Rug
Making a cloth rug is more than a craft project—it’s a sustainable habit, a creative outlet, and a way to personalize your home with unique, meaningful pieces.
Start with the method that matches your skill level and available materials. Beginners should try the no-sew T-shirt braid or finger crochet, which require only scissors and patience. Intermediate crafters can tackle the jelly roll spiral or fabric twine methods for more polished results. The vinyl-backed technique offers the most practical durability for kitchens and high-traffic areas.
Pre-wash all fabric scraps if possible to prevent color bleeding after your rug is complete. Use a walking foot when sewing thick layers to prevent shifting and jamming. Keep a fabric twine ball ready for small touch-up projects. Label your methods so you can replicate your favorites.
With 11 methods to choose from, there’s no wrong way to start learning how to make a cloth rug. Grab those old clothes gathering dust in your closet and turn them into something beautiful for your floors. Your home—and the planet—will thank you.
Frequently Asked Questions About Making Cloth Rugs
What is the easiest method for beginners to make a cloth rug?
The no-sew T-shirt rag rug and finger crochet methods are the easiest for beginners. Both require only basic tools (scissors and optionally a tapestry needle), no sewing machine, and can be completed in 3-6 hours. The sweater glue-on method is also beginner-friendly, taking just 2-3 hours.
How long does it take to make a cloth rug?
Time varies significantly by method. Sweater glue-on rugs take 2-3 hours. T-shirt braid and finger crochet take 3-6 hours. Jelly roll and fabric twine spiral rugs take 8-15 hours. Shag towel rugs require 6-10 hours due to the dense attachment process.
Can I use any type of fabric for making rugs?
Most fabric types work well. T-shirts (jersey knit) are stretchy and forgiving. Cotton sheets tear easily and braid well. Denim offers durability for high-traffic areas. Quilting cotton provides pre-cut convenience. Sweaters create fluffy texture. Terry cloth towels excel for absorbency. Avoid slippery fabrics like satin that won’t hold their shape.
How do I clean a handmade cloth rug?
Cleaning method depends on construction. Machine-sewn fabric rugs wash gently in cold water and air dry. Braided rugs need hand washing or spot cleaning. Glue-based rugs spot clean only—water destroys the adhesive. Vinyl-backed rugs simply wipe clean with a damp cloth and mild soap.
Are cloth rugs durable enough for high-traffic areas?
Yes, when made with appropriate materials. Denim and vinyl-backed rugs handle heavy foot traffic best. The polyurethane seal on vinyl-backed rugs provides the most durability. Braided and sewn construction with reinforced edges holds up well. Avoid delicate methods like finger crochet in high-traffic zones.







