
You’ve got old cotton sheets, worn-out t-shirts, or leftover fabric scraps sitting in a drawer. Instead of throwing them away, you can turn that fabric into something beautiful and useful, like a handmade cotton rug. Whether you want a cozy bath mat, a vibrant floor rug, or a decorative hot pad, making a cotton rug at home is affordable, eco-friendly, and surprisingly simple.
This guide covers four no-sew or low-tool methods for creating cotton rugs from repurposed materials. You’ll learn how to prep fabric, choose the best technique for your skill level, and finish a durable, washable rug that adds warmth and personality to any space in your home.
Choose Your Cotton Rug Method Based on Your Skill Level
Each rug-making method offers unique benefits depending on your time, tools, and desired outcome. Here’s a quick breakdown to help you pick the right one.
Match the Method to Your Goals
• Knotted rugs work great for beginners and create thick, textured surfaces perfect for hot pads or decorative mats.
• Braided rugs offer a classic look with excellent durability, making them ideal for bedrooms or living areas.
• Woven rugs lay flat and sturdy, excellent for entryways or placing under furniture.
• Crocheted rugs are fast to complete and flexible in design, with easy repair options for accent rugs.
Pick based on what matters most to you: speed, softness, durability, or design control.
Time and Size Estimates
| Rug Type | Size | Time Required |
|---|---|---|
| Coaster | 6″x8″ | 30–60 minutes |
| Bath Mat | 18″x24″ | 4–6 hours |
| Room Rug | 3’x5′ to 5’x8′ | 10+ hours (over multiple sessions) |
Larger rugs take more time, but the satisfaction of completing them is worth it. Start small if you are new to rug making.
Prepare Cotton Fabric Strips for Your Rug

You do not need to buy new fabric. Old cotton bedsheets, t-shirts, pillowcases, or clothing work perfectly for making a cotton rug. Just make sure the materials are mostly cotton, as synthetic blends tend to fray easily and do not hold knots well.
Best Fabric Choices for Rug Making
• 100% cotton sheets (queen or king size) tear cleanly and create strong strips.
• Cotton t-shirts feature stretchy knit that coils easily and bends without breaking.
• Flannel pajamas or quilting cotton provide a softer feel underfoot.
Pre-wash all fabric before cutting to prevent shrinkage later.
Cut or Tear Strips the Right Way
For sheets and woven cotton, lay the fabric flat and mark every 2 inches along one edge. Cut a half-inch slit at each mark, then tear the fabric gently across the room. Cotton tears straight along the grain, producing stronger edges that fray less than cut ones.
For t-shirts and knits, cut off the sleeves and neckline first. Slice in a spiral around the torso to create one long strip. Use 1 to 2 inch widths depending on how thick you want your rug to be.
Pro tip: Roll strips into a ball as you go to avoid tangles while you work.
How Much Fabric Do You Need
| Material | Approximate Rug Size |
|---|---|
| 2 queen sheets | ~2×3 ft rug |
| 3–4 queen sheets | ~4 ft diameter rug |
| 10 t-shirts | Medium circular rug |
| 15+ t-shirts | Large floor rug |
Do not worry about exact counts. Simply join strips together as needed.
Make a Knotted Rag Rug Without Sewing
This method builds a dense, textured rug by knotting fabric around a central anchor strip. No sewing and no loom required, just a hook and your hands.
What You Will Need
• 2-inch-wide cotton strips
• Large crochet hook or rag-rug tool
• One long anchor strip (same or contrasting color)
• Clip or tape to secure the anchor
Tie the First Knot
Fold the end of a working strip and cut a half-inch slit in the fold. Slide the anchor strip through the slit to create a slipped knot. Secure the anchor to your work surface with a clip.
Thread the working strip through the hook’s hole. Loop over the anchor, pull underneath, then draw back through the loop to form one knot. Repeat this motion across the row.
It feels like crochet, but you are knotting rather than stitching.
Build Rows and Add New Strips
When a strip runs out, slide the hook off and thread the new strip through the last knot and its own slit. Pull tight and keep knotting.
For the next row, lift the top loop of each knot from the row below. Knot the new row over these lifted loops. Keep tension moderate. Too tight causes curling, and too loose creates gaps.
Finish Your Knotted Rug
When the rug reaches your desired length, tie the two ends together like a shoelace. Use the hook to weave loose ends into nearby knots. Optional: add a crocheted border with contrasting thread for a polished look.
✅ Best for: Hot pads, mug rugs, bath mats
✅ Durability: High (especially with batik cotton)
❌ Washability: Hand wash only, as thick knots hold water
Braid and Coil a Cotton Rag Rug
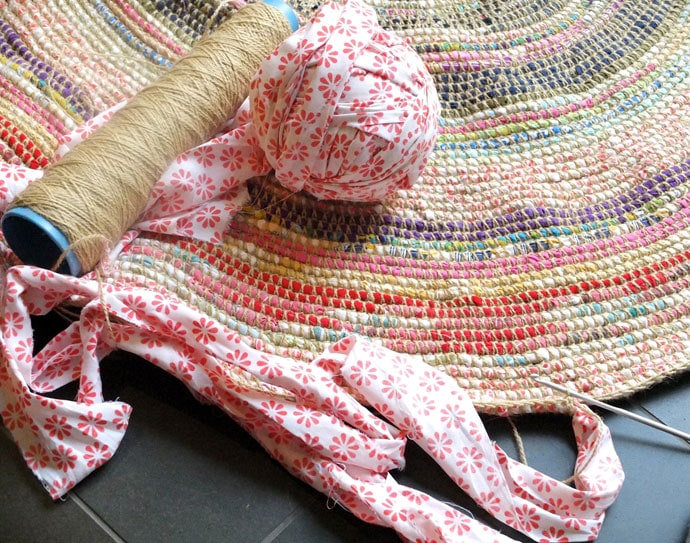
There are two ways to make a braided rug. Choose based on your fabric type.
Pick the Right Braiding Method
For stretchy fabric like t-shirt yarn, use the in-the-round coiling method. Braid 2 to 3 inches, then start curling into a spiral. Use a tapestry needle on the innermost strand. Every time it becomes the inside strand, thread it through the outer loop of the previous braid section. Keep braiding after each pass. The braid locks itself as you go with no extra sewing needed.
For non-stretch cotton like sheets, flannel, or quilting cotton, braid the entire length first. Coil it tightly from the center outward. Thread a tapestry needle with strong thread or yarn and sew through the inner loops, stitching each coil to the one below. Hide the thread inside the braid.
Start coiling before finishing the braid to avoid tangles.
Join New Strips Without Bulk
Do not knot the strips. Instead, use the hole-and-loop method. Fold the end of the old strip and cut a small slit in the fold. Do the same on the new strip. Thread the new end through the old strip’s hole, then through its own hole. Pull tight. This creates a smooth, nearly invisible connection.
Finish Your Braided Rug Cleanly
Taper the last 3 to 4 inches of each braid end to a point. Hand-stitch them together. Tuck the knot under or to the side for a seamless look.
✅ Best for: Living rooms, bedrooms
✅ Washability: Machine wash on gentle cycle, air dry
✅ Flatness: Good if tension stays even
Weave a Rug on a Cardboard Loom
This method produces a flat, sturdy rug with a braided appearance. You do not need to buy a loom. Make one from cardboard.
Build a Simple Loom
Cut a rectangle from heavy cardboard, approximately 23 inches by 43 inches. On each short end, start 2 inches from the corner and mark every half inch. Cut 2-inch vertical slots at each mark. You will have about 84 slots, enough for a 40-inch-wide rug.
Set Up the Warp
Group three 2-inch fabric strips together and fold the group lengthwise. Insert one end into the first slot on one side and the other end into the matching slot on the opposite side. Repeat across all slots. These vertical strands form the rug’s skeleton.
Weave the Weft
Use a single strip as your weaving strand. Start 2 inches in from the edge and leave a 6-inch tail at the beginning (you will secure it later). Weave under and over each warp group. At the end, U-turn while maintaining the same under-over pattern and weave back. Push each row close to the last for density. Use your fingers to straighten and tighten as you go.
Extend the Weaving Strip
When you run out of the current strip, cut a half-inch slit in the end. Insert 1 to 2 inches of the new strip into the slit. Pull the new end through its own slit to form a tight, knot-free join. Continue weaving without adding bulk.
Finish and Remove from Loom
When 2 inches from the end, make your final U-turn. Weave the tail back through the last row to secure it. Tie it to a warp strand if needed. Trim excess warp and weft evenly. Carefully cut and remove the cardboard.
✅ Best for: Entryways, under furniture
✅ Flatness: Excellent
✅ Washability: Machine wash gentle, lay flat to dry
Crochet a Cotton Rag Rug
This method is fast and forgiving. Use a large crochet hook (9 to 10 mm) and 1 to 1.5 inch strips.
Join Strips and Start the Center
To join strips, lay the ends together with the right strip over the left, then left over right. Tie a double knot to secure it. The knot stays hidden on the back of the rug. Roll the joined strips into a ball to prevent tangling.
Make the Foundation Ring
Create a slip knot on the hook and chain 3 stitches. Pull the working end through the first chain to join into a ring. You will work in spiral rounds from the center outward.
Build the Rug in Rounds
Round 1: work 8 to 10 single crochets into the center ring. Round 2: work 2 single crochets in each stitch to double the count. Round 3 and beyond: work 2 single crochets in one stitch, then 1 single crochet in the next stitch, repeating around. This staggered increase keeps the rug flat.
Watch for curling. If edges curl up, you are increasing too fast. If it ruffles, you are not increasing enough.
Change Colors and Finish
To switch colors, cut the old strip and leave a short tail. Tie on the new one with a double knot and continue. The knots stay on the underside.
To finish, cut the last strip and leave a 2 to 3 inch tail. Pull it through the last loop on the hook. Tie a knot and tuck the end into the rug’s underside with a tapestry needle.
✅ Best for: Accent rugs, playrooms, nurseries
✅ Repairability: Easy; just unravel and re-crochet
✅ Washability: Machine wash, low heat dry
Customize Your Rug’s Look
Making a cotton rug lets you express your personal style through color and design choices.
Mix Colors and Patterns
• Monochromatic: Different shades of blue or gray create a calm look.
• Color blocking: Use 3 to 4 solid colors in sections.
• Ombre: Fade from light to dark across the rug.
• Bohemian mix: Combine floral, stripe, and solid strips.
Sort your strips by color before starting to control the final design.
Control the Shape
For circular rugs, start with a short braid or small crochet center. For oval rugs, begin with a longer braid, fold the ends, and braid around them. For rectangular rugs, use the knotted or woven method with straight rows.
Adjust Texture
For a thicker rug, use triple-layered strips or braid tightly. For a softer feel, use flannel or t-shirt yarn. For a fluffy finish, gently pull loops apart. This works well with knotted or crocheted rugs.
Care for Your Cotton Rug
Proper care extends the life of your handmade rug.
Clean and Store Properly
Spot clean with mild soap and water. Hand wash in cold water for knotted rugs. Machine wash (gentle cycle) for braided, woven, and crocheted rugs. Air dry or tumble dry on low. Never use high heat.
Avoid bleach. It weakens fibers and fades colors.
Prevent Wear and Tear
Rotate the rug monthly to even out foot traffic. Trim loose threads with scissors. Reinforce edges with a few hand stitches if fraying starts.
Fix Common Problems
Why Is My Rug Curling
For crocheted rugs, inconsistent increases cause curling. Stick to the 2-in-1, 1-in-1 pattern. For woven rugs, uneven tension at turns creates curls. Keep edges aligned. For braided rugs, the tension is either too tight or too loose. Maintain a steady pull throughout.
How Do I Repair a Damaged Section
For knotted or woven rugs, re-knot or re-weave the damaged spot. For crocheted rugs, unravel a few rounds and re-crochet. For braided rugs, sew loose coils back in place.
Key Takeaways for Making a Cotton Rug
With just old clothes and a little time, you can create a rug that is eco-friendly, washable, and uniquely yours. Start small with a coaster or bath mat to practice your technique before moving to larger projects. Use batik cotton for durability, pre-wash all fabric to prevent shrinkage, and keep tension consistent throughout for a flat, professional look.
Whether you knot, braid, weave, or crochet, every stitch turns scraps into something meaningful. Grab those sheets, cut some strips, and start crafting your perfect cotton rug today.
Frequently Asked Questions About Making a Cotton Rug
What is the easiest method for beginners to make a cotton rug?
The knotted rag rug method is the easiest for beginners. It requires only fabric strips, a large crochet hook, and an anchor strip. No sewing or special tools are needed, and the technique is forgiving of minor mistakes.
Can I use old t-shirts to make a cotton rug?
Yes, cotton t-shirts work excellently for braided and crocheted rugs. Their stretchy knit fabric coils easily and bends without breaking. Cut t-shirts in a spiral around the torso to create long, continuous strips.
How do I prevent my crocheted rug from curling?
Maintain a consistent increase pattern. Use 2 single crochets in one stitch, then 1 single crochet in the next, repeating around. If edges curl up, you are increasing too fast. If it ruffles, you are not increasing enough.
Can I machine wash my handmade cotton rug?
Braided, woven, and crocheted rugs can be machine washed on a gentle cycle with cold water. Knotted rugs should be hand washed only, as thick knots hold water. Always air dry or tumble dry on low heat.
How long does it take to make a cotton rug?
A coaster takes 30 to 60 minutes. A bath mat (18″x24″) takes 4 to 6 hours. A room-sized rug (3’x5′ to 5’x8′) takes 10 or more hours, typically spread over multiple sessions.
What fabric is best for a durable cotton rug?
Batik cotton is the best choice for durability. It has a tighter weave that resists fraying and holds up well over time. High-thread-count cotton sheets also work well for long-lasting rugs.







