
Is your favorite rug stained, outdated, or just not matching your room anymore? Replacing it costs hundreds of dollars, but painting a carpet rug gives you a custom look for a fraction of the price. This creative DIY project transforms inexpensive remnant rugs into stunning statement pieces using simple materials you likely already have at home. Whether you want a bold geometric design, a natural wood-grain pattern, or a simple color refresh, painting lets you create exactly what you envision.
This guide walks you through every step of the process, from selecting the right rug base to sealing your finished creation for lasting durability. You’ll learn which materials work best, how to mix paint for the perfect consistency, and troubleshooting tips for common problems. By the end, you’ll have the knowledge to transform any tired rug into a personalized work of art.
Choose the Right Rug for Painting

Not every rug can handle paint. The foundation of your project starts with selecting a rug that will accept paint properly and maintain flexibility after drying.
Best Rug Materials for Paint Application
Synthetic materials work best for painting because they resist moisture and allow paint to penetrate fibers evenly. Polypropylene rugs rank as the top choice for both indoor and outdoor projects. These synthetic fibers hold paint well when properly prepared and withstand the dilution needed to prevent stiffness. Flatweave synthetic rugs offer another excellent option. Their tight weave creates a smooth surface ideal for crisp patterns, stencils, and geometric designs.
Remnant rugs from hardware stores provide an affordable starting point, typically costing between twenty and thirty dollars. These are often made of polypropylene and serve as perfect practice pieces for your first project. Cotton blend rugs work for indoor use but require flexible sealants to prevent cracking over time.
Rugs You Should Avoid
High-pile or shag rugs present major challenges. Paint cannot penetrate evenly through long fibers, resulting in blotchy, uneven coverage and a crunchy texture that never softens. Natural fibers like wool and jute tend to stiffen dramatically after painting and may reject standard paints unless treated with fabric-specific products.
Rubber-backed rugs cause problems at the edges where paint peels and moisture gets trapped. If your rug has a rubber backing, remove it if possible or choose a different rug for your project.
Pro Tip: Always start with a light-colored rug. Dark rugs require a full base coat to prevent the original color from distorting your design.
Clean and Prep the Rug Properly
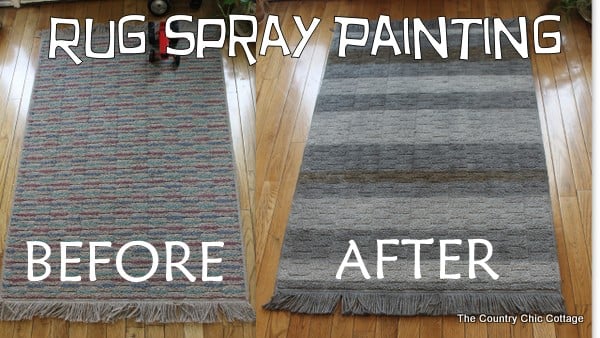
Skipping proper cleaning leads to peeling, bubbling, and poor paint adhesion. This step determines how well your design holds up over time.
Step-by-Step Cleaning Process
Begin by vacuuming the rug thoroughly to remove all dust and debris. Wash the rug using mild detergent and water, scrubbing gently with a soft brush. Rinse completely to eliminate all soap residue, as leftover detergent interferes with paint bonding.
Lay the rug flat to dry completely. Use sunlight if available or set up fans to speed drying. This step is critical. Painting a damp rug is the number one cause of project failure, leading to mold, poor adhesion, and bubbling.
Planning Your Design
Sketch your design directly onto the rug using chalk or pencil. For complex patterns, create stencils from cardboard or plastic sheets. Use painter’s tape to create test layouts and grid patterns. Mark centerlines and quarter-points to ensure symmetry in your final design.
Warning: Never attempt to paint a damp rug. Moisture trapped beneath paint creates mold and causes the finish to peel within weeks.
Mix Paint for the Perfect Consistency
The paint mixture makes or breaks your project. Too thick and your rug becomes crunchy. Too thin and coverage fades quickly.
The Ideal Paint Formula
The winning combination uses three equal parts. Mix one part paint, one part fabric softener, and one part water. This creates a consistency similar to whole milk that penetrates fibers deeply while maintaining flexibility.
For initial testing, use a fifty-fifty blend of paint and fabric softener. This thicker mixture helps you gauge color and absorption before committing to the final formula.
Best Paint Types for Your Project
Exterior acrylic paint offers weather resistance and vibrant colors, making it ideal for outdoor rugs. Fabric paint provides flexibility and less stiffness, best suited for natural fibers and decorative indoor pieces. Diluted latex paint works well when mixed with fabric medium. Many crafters report success using leftover wall or ceiling paint thinned with fabric softener and water.
Spray paint like Krylon delivers even coverage without brush strokes. Apply in light coats to avoid creating a stiff, crunchy texture.
Expert Note: Estimate four times more paint than you initially think you will need. Running out mid-project leads to color mismatches that are nearly impossible to fix.
Apply Paint with Precision
Your application technique determines the final texture, coverage, and design clarity. Work in a warm, dry, well-ventilated area like a garage or covered patio.
Keep the Surface Damp
Use a spray bottle to keep fibers moist during painting. Damp fibers absorb paint deeper, reducing surface-only coating that leads to stiffness. Mist the area as you work, but avoid soaking.
Painting Techniques for Different Results
Freehand painting suits organic designs like wood-grain, feathers, or vine patterns. Lightly sketch your design with chalk first. Use a stiff one-inch brush to swirl paint into fibers, or massage paint in with gloved hands for deeper saturation.
Stencil painting requires securing your stencil with tape. Burnish the edges with a credit card to prevent bleeding. Trace the outline with a Sharpie for clean edges, then fill in using a foam brush with a stippling motion. Let each section dry before moving the stencil.
Tape-guided patterns work well for geometric shapes and borders. Press painter’s tape firmly to create crisp lines. Paint over the tape, allow it to dry completely, then peel slowly to reveal clean edges.
Spray painting provides even coverage for solid colors or gradients. Hold the can six to twelve inches away and apply thin, even coats. Two to three layers typically achieve full coverage.
Pro Tip: Apply two to three thin coats rather than one thick layer. This approach delivers better coverage with less stiffness.
Fix Common Painting Problems
Even careful painters encounter issues. Most problems have simple solutions, so do not panic if your project does not look perfect immediately.
Troubleshooting Guide
Paint appearing too stiff indicates your mixture needs more fabric softener and water. Add these to your remaining paint and test on a hidden area. Uneven coverage comes from applying paint to dry fibers. Keep the spray bottle handy and maintain damp conditions throughout application.
Muddy colors result from overworking wet paint or painting adjacent sections before previous ones dry. Let each color dry completely before adding nearby shades. Bleeding under stencils or tape happens when edges are not properly burnished. Press tape firmly and use stippling motions rather than brushing.
Running out of paint creates mismatched colors that are difficult to repair. Save extra mixed paint in labeled containers for touch-ups. Blotchy results often respond well to adding another thin coat once the first layer dries.
Good News: Most mistakes can be painted over after drying. Many imperfections become charming character traits in finished pieces.
Dry and Cure Completely
Patience here determines durability. Rushing this step ruins all your hard work.
Drying Timeline
Touch-dry status arrives within one to two hours per coat. Wait this long before applying additional layers. Full cure requires twenty-four to forty-eight hours before any foot traffic or handling. Sealant drying takes an additional six to twelve hours depending on the product.
Cold or humid conditions extend these timelines significantly. Plan your project for dry weather when possible.
Seal for Long-Term Protection
Sealing protects your work from UV fading, water damage, and everyday wear. This step is not optional, especially for high-traffic areas.
Why Sealing Matters
Unsealed paint fades quickly under sunlight and wears away with regular use. Sealer adds water and stain resistance while reducing chipping. For outdoor rugs, proper sealing is absolutely essential to withstand weather exposure.
Best Sealers by Situation
Acrylic spray sealer provides a flexible, clear finish without brush marks. This works well for large rugs and outdoor applications. Polyurethane offers maximum durability for high-traffic indoor areas but may yellow over time. Fabric protectors like Scotch Guard provide light protection and easy application for decorative indoor pieces.
Apply thin, even coats over the entire surface. Let each coat dry according to product instructions before adding another layer. Reapply sealant every one to two years for outdoor rugs and high-use areas.
Critical: Outdoor rugs absolutely must receive UV-resistant, waterproof sealing to last more than a single season.
Maintain Your Painted Rug Over Time
A painted rug requires different care than an untreated one. Proper maintenance extends its life significantly.
Cleaning Tips
Vacuum regularly using standard settings. Spot clean with mild soap and damp cloths. Avoid machine washing, which cracks and peels paint. Skip harsh scrubbing or steam cleaning, as these damage the painted surface.
Long-Term Care
Inspect your rug seasonally for wear, especially in high-traffic zones. Touch up faded areas using your saved paint mixture. Reapply fabric protector annually to maintain stain resistance.
One dedicated crafter reported their painted rug lasted two years with regular use before cat accidents necessitated replacement. They considered the twenty-dollar investment and creative satisfaction a definite win.
Indoor Versus Outdoor Use
Where your rug lives determines which materials and techniques work best.
Indoor painted rugs typically use fabric paint or diluted latex. Sealing remains optional, depending on use intensity. Expect two or more years of life with proper care.
Outdoor painted rugs require exterior acrylic or spray paint. Sealing is mandatory, using UV-resistant and waterproof products. Expect one to three years of durability with annual resealing.
Frequently Asked Questions About Painting a Carpet Rug
Can I paint a rug that has a rubber backing?
Rubber-backed rugs present challenges. Paint often peels at edges where the backing meets the rug surface. Moisture can get trapped and cause mold. Remove the backing if possible before painting, or choose a different rug without rubber backing.
Will painted rugs feel stiff after drying?
Some stiffness is inevitable, especially with acrylic paints. Using the fabric softener and water mixture minimizes this effect. The texture often softens slightly over time with regular use and foot traffic.
How long does a painted rug last?
Indoor painted rugs typically last two or more years with proper sealing and gentle care. Outdoor rugs last one to three years with annual resealing. High-traffic areas wear faster than low-traffic zones.
Can I use regular house paint on a rug?
Regular house paint works if diluted properly with fabric medium and water. However, it tends to stiffen fibers more than exterior acrylic or fabric-specific paints. Test your mixture on a small, hidden area first.
How do I clean a painted rug without damaging the design?
Vacuum regularly on standard settings. Spot clean spills immediately with mild soap and a damp cloth. Avoid scrubbing, steam cleaning, or machine washing. Reapply fabric protector annually for best results.
What if my paint color looks wrong after drying?
Paint typically dries slightly darker than it appears when wet. Always test your color on a hidden corner before committing to the full design. Save extra mixed paint for touch-ups if needed.
Key Takeaways for Successfully Painting Your Rug
Painting a carpet rug transforms inexpensive or damaged pieces into custom floor art. Success depends on choosing the right base material, properly preparing the surface, and mixing paint to the correct consistency. Keeping fibers damp during application and applying thin coats prevents stiffness and ensures even coverage.
Sealing your finished rug protects your work and extends its life significantly. Indoor rugs benefit from optional fabric protector, while outdoor rugs absolutely require UV-resistant, waterproof sealer. Regular maintenance and annual resealing keep your painted rug looking fresh for years.
The beauty of this project lies in its flexibility. Mistakes become unique character. Colors can be adjusted. Designs can evolve. Your painted rug becomes a personal expression that no store-bought piece can match. Start with an affordable remnant rug, experiment with techniques, and enjoy the creative process of making something entirely your own.







