
You unroll your new area rug, excited to place it in your living room, only to find it is full of wrinkles, ripples, and stubborn curled edges. This is a common problem with machine-made rugs shipped tightly rolled. The good news? You do not need professional help to fix it. With the right technique, you can iron a rug flat safely using tools you already own.
The key is using steam and a damp cloth barrier to relax compressed fibers without damaging the material. Whether your rug is polypropylene, cotton, wool, or a blend, this guide reveals the proven method to eliminate creases, prevent melting, and achieve a smooth, flat finish.
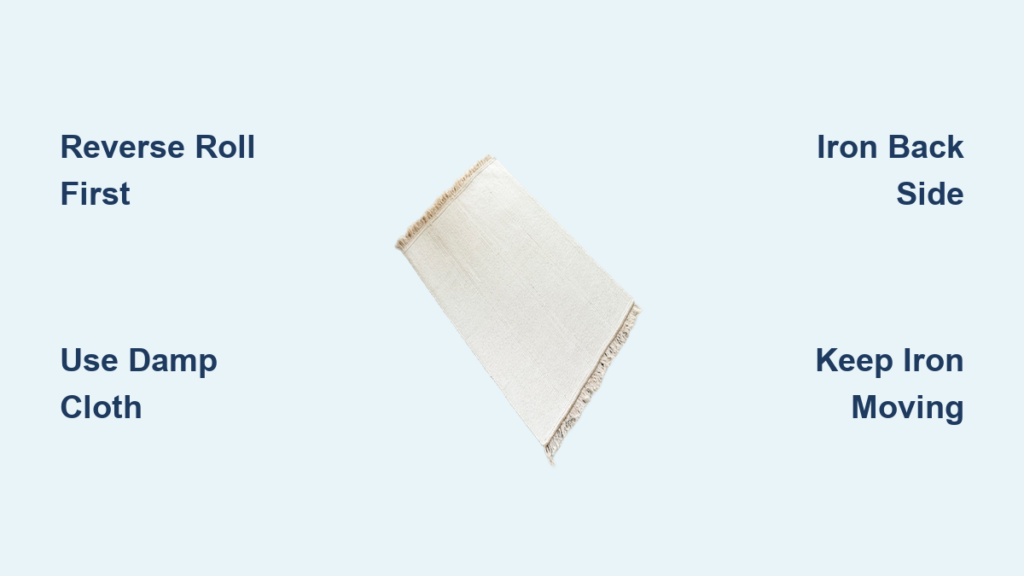
Reverse the Roll First
Before applying any heat, reverse the factory-induced tension locked into your rug. This simple step prepares the fibers for flattening and often removes mild curling on its own.
Why Reverse Rolling Works
Rugs develop ripples because they have been tightly rolled during shipping with the pile side inward. This compresses fibers into a curved shape. By re-rolling the rug with the good side facing out, you begin to counteract that stored tension.
How to Reverse Roll Correctly
Lay the rug flat and roll it from one end to the other with the top piled side on the outside of the roll. Apply gentle hand pressure along the roll to help reshape the fibers. Let it rest undisturbed for 24 to 48 hours.
After unrolling, you will often see immediate improvement. Edges lie flatter and central bubbles begin to relax. This step alone resolves mild curling in many cases, especially with cotton or wool rugs.
Pro Tip: Combine reverse rolling with weighted flattening by placing heavy books or suitcases on curled corners overnight.
Set Up the Iron Safely
Using the wrong heat setting or direct contact can ruin your rug. Setting up correctly prevents damage and ensures effective results.
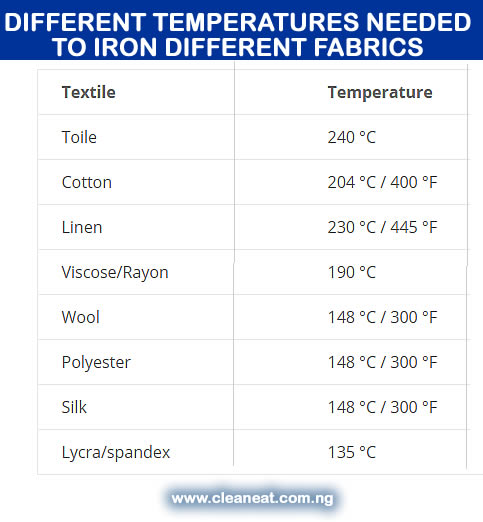
Choose the Right Heat Setting
Different rug materials require different heat approaches. Cotton or wool rugs tolerate high heat with steam. Polypropylene, olefin, and polyester rugs require low to medium heat with minimal or no steam. Always test first on blends or unknown materials.
Synthetic fibers have low melting points. Polypropylene melts around 160°C or 320°F, so high heat can cause shiny spots, hardening, or melting.
Prepare the Iron
Fill the iron with distilled water to prevent mineral deposits. Let the iron fully heat before use. Plug in an extension cord if working on a large rug far from outlets.
Always work on a flat, rigid surface like an ironing board, plywood, or thick cardboard on a hard floor. Avoid carpeted or soft surfaces, which reduce effectiveness and risk floor damage.
Use a Damp White Cotton Cloth
Never place the iron directly on the rug. A protective barrier is essential for safe heat application.
Why the Cloth Matters
A 100% white cotton towel or cloth acts as a heat diffuser to prevent scorching. It also serves as a moisture regulator to release steam gradually. The cloth acts as a dye barrier to avoid color transfer.
Colored or synthetic cloths can bleed dyes under heat. Only use white, absorbent cotton like an old pillowcase or tea towel.
How to Apply the Cloth
Soak the cloth in water until fully moist. Wring out thoroughly so no dripping occurs. Fold in half for better coverage and reuse. Lay the cloth over the back non-pile side of the rug, focusing on wrinkled areas.
Keep a spray bottle nearby to re-dampen the cloth as it dries during use.
Warning: Never oversaturate. Excess moisture can seep into the backing and cause warping or mold.
Steam the Rug Back Side
Apply heat indirectly to relax fibers and flatten creases safely.
Step-by-Step Ironing Process
Place the damp cloth over a wrinkled section of the rug back. Glide the iron in slow, overlapping strokes and never stop in one spot. Apply gentle to firm pressure to help fibers settle. Limit dwell time to 5 to 10 seconds per area to avoid overheating.
Remove the cloth and check progress. Repeat if needed. For stubborn creases, hold the iron slightly longer but monitor closely, especially on synthetics.
Move to the next section, re-wetting the cloth as needed. Allow the rug to cool between passes, especially on synthetic materials.
Work in 30 to 60 minute sessions, treating one quadrant at a time. Most rugs require only one full treatment.
Visual Cue: When successful, the backing appears smoother and edges lie flat when unrolled.
Handle Problem Areas
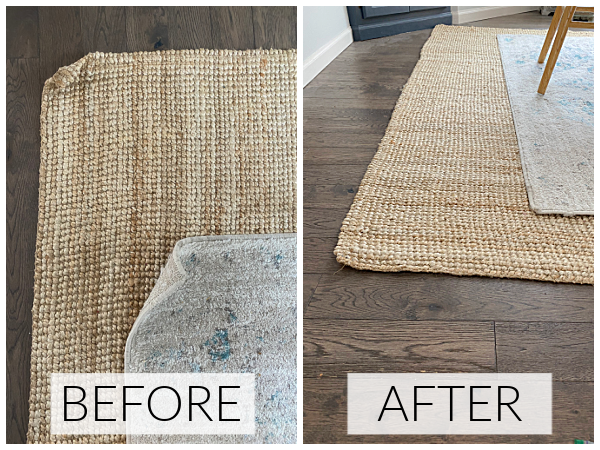
Some spots resist treatment. Use targeted techniques to fix them.
Flatten Curled Corners
Place the damp cloth over the curled edge. Iron in circular motions, applying slight outward pressure. After steaming, fold the corner under briefly, then release to reset the memory. Follow with weighted flattening using a heavy book.
Smooth Central Bubbles
Stretch the rug flat by hand before steaming. Work from the center outward, pushing air toward the edges. Use a wide-tooth comb or fingers to gently separate fibers if needed.
Fix Seams or Buckling
If seams are lifting or the rug is buckling, iron along the seam line with low heat. Press with a clean, dry cloth afterward to seal. Consider applying residue-free rug tape underneath after treatment.
Alternative Methods No Iron Needed
Cannot use an iron? Try these safe, effective alternatives.
Reverse Roll Plus Weights
Re-roll the rug face-out and let it rest 24 to 48 hours. Unroll and place heavy objects like books, planters, or suitcases on ripples. Leave for 2 to 7 days and flip the rug occasionally to balance pressure.
This method works best for mild curling and acclimation, particularly on cotton and jute rugs.
Solar Heating Method
Lay the rug back side up on clean concrete or asphalt. Choose a sunny morning and avoid midday heat. Leave for 20 to 60 minutes, rotating halfway through.
Heat relaxes fibers and UV helps reset shape. Do not exceed 30 minutes daily, as prolonged sun exposure can fade colors and degrade fibers.
Handheld Steamer or Garment Steamer
Hold the nozzle 2 to 3 inches above the rug back. Pass slowly over creased areas. Let steam penetrate, then press flat by hand.
This method involves no direct contact, making it safer for delicate rugs.
Mist and Air Dry
Lightly mist the back of the rug with water. Stretch flat and allow to dry naturally. Use this method on thin cotton, dhurrie, or flatweave rugs.
Avoid soaking. Just dampen the rug, as over-wetting causes swelling or delamination.
Hairdryer Use With Caution
Hold the hairdryer 6 to 9 inches away from the back of the rug. Use low or medium heat in a sweeping motion. Heat until pliable, then press flat manually.
This method carries high risk on synthetics and can melt fibers. Only use as a last resort.
Material-Specific Tips

Different rugs react differently to heat and moisture. Know your rug type before treating.
Polypropylene Rugs
These rugs are most prone to curling. Use low heat only and always use a damp cloth barrier. Avoid dry heat, which can harden fibers.
Cotton Rugs
Cotton responds well to steam and can handle high heat settings. May need multiple passes for deep creases.
Wool Rugs
Wool can shrink or felt with excess moisture. Use high heat with a barely damp cloth. Avoid over-wetting. For valuable pieces, seek professional cleaning.
Jute, Sisal, Sea Grass
Use low to medium heat and avoid steam, which causes swelling. These materials respond best to reverse rolling and weights.
Outdoor Rugs
These are typically synthetic. Use reverse roll first. If ironing, use very low heat and minimal steam. Always test a hidden corner first.
Hand-Knotted or Antique Rugs
Do not attempt DIY heat methods. Risk of irreversible damage is too high. Consult a certified rug restoration specialist.
Prevent Re-Curling for Good
Flattening is only half the battle. Keep your rug flat long-term with these strategies.
Use a Non-Slip Rug Pad
Place a rug pad under the entire rug. This prevents slipping and tripping. It reduces fiber stress from foot traffic. It helps maintain flatness and extends rug lifespan.
Choose a standard pad for hardwood, tile, or laminate. Use a carpet-to-carpet gripper pad for wall-to-wall carpet.
Apply Indoor Carpet Tape
Use double-sided rug tape along edges. Apply every 6 to 8 inches around the perimeter. Press firmly with a roller or heavy object and trim excess.
This works on tile, concrete, hardwood, and carpet. For laminate floors, use less adhesive to avoid surface damage.
Anchor with Furniture
Place heavy furniture like sofas, coffee tables, or bookshelves on rug corners. This keeps edges down and prevents shifting.
Avoid dragging furniture. Lift instead to prevent fraying.
Avoid Common Mistakes
Even small errors can ruin your rug. Learn what to avoid.
Never Iron Directly
Direct contact causes melting on synthetics, scorching on natural fibers, and shiny patches or dye transfer. Always use a white damp cotton cloth.
Do Not Use Colored or Synthetic Cloths
They may bleed dyes under heat. Stick to 100% white cotton.
Avoid Standing Water
Oversaturating leads to fiber swelling, mold growth, and delamination of backing. Dampen the cloth, do not soak it.
Keep the Iron Moving
Leaving the iron in one spot causes burn marks or localized melting. Use continuous, overlapping strokes.
Test First
Always test on a hidden corner, especially for synthetics.
Check Manufacturer Labels
Some rugs are not heat-safe. Ignoring care labels may void warranties.
When to Call a Professional
Some situations require expert help rather than DIY methods.
Seek Professional Restoration If
Rug is antique, hand-knotted, or high-value such as Persian or silk. Wrinkles persist after multiple DIY attempts. You notice structural issues like warped backing, delamination, or seam separation. The rug buckled after cleaning and will not flatten.
Professional Services Include
Industrial steam pressing, humidification chambers for even fiber relaxation, dry cleaning or hand washing, and stretching on a frame.
Tip: Find a certified rug specialist with experience in your rug material and origin.
Maintain a Flat Rug Long-Term
Flattening is not a one-time fix. Regular care keeps your rug looking new.
Vacuum Weekly
Use suction-only mode for delicate rugs. Avoid beater bar on fringes or loose weaves. This helps maintain pile texture and flatness.
Rotate Every 6 Months
This ensures even wear and light exposure and prevents one-sided compression.
Control Indoor Humidity
Use a dehumidifier in humid climates. Use a humidifier in dry winter months. This prevents fiber contraction or swelling.
Store Properly
When not in use, roll the rug, do not fold it, with face outward. Wrap in breathable fabric like a cotton sheet. Store in a dry, pest-free, climate-controlled area.
Re-treat with steam if wrinkles return after washing or moving.
Final Results You Can Expect
When you iron a rug flat correctly, you will see no ripples, bubbles, or lifted corners. The surface lies smooth and flush with the floor. Edges stay down with proper anchoring. Results are long-lasting with a rug pad or tape.
Most users see visible improvement within minutes, with full flattening in under an hour. Combination methods like reverse roll plus steaming plus weights deliver the fastest, most durable results.
This technique works especially well on newly shipped rugs from brands like Unique Loom, Safavieh, or Amazon machine-made area rugs.
Frequently Asked Questions About Ironing a Rug Flat
Can I iron a rug that is made of polypropylene?
Yes, but with caution. Polypropylene has a low melting point around 160°C or 320°F. Use low heat only and always place a damp white cotton cloth between the iron and the rug. Test on a hidden corner first.
How long does it take to iron a rug flat?
Most rugs require 30 to 60 minutes for full treatment, plus 24 to 48 hours of rest time after reverse rolling. Stubborn wrinkles may need a second session.
Can I iron the front of the rug instead of the back?
No. Always iron the back side of the rug. Ironing the front can damage the pile, cause color fading, and create shiny spots. The back absorbs heat and steam better for fiber relaxation.
What happens if I leave the iron in one spot too long?
Leaving the iron in one spot causes burn marks, melting on synthetics, or scorching on natural fibers. Always keep the iron moving in overlapping strokes. Limit dwell time to 5 to 10 seconds per area.
Will ironing my rug damage the floor underneath?
This depends on your work surface. Always use a flat, rigid surface like an ironing board, plywood, or cardboard on a hard floor. Avoid working on carpet, as heat can damage carpet fibers and potentially the floor beneath.
How do I keep my rug flat after ironing?
Use a non-slip rug pad underneath. Apply double-sided carpet tape along edges. Anchor corners with heavy furniture. These methods prevent re-curling and maintain flatness long-term.
Key Takeaways for Ironing Your Rug Flat
The most important steps are reverse rolling first, using a damp white cotton cloth barrier, and keeping the iron moving at all times. Set the correct heat for your rug material, with low heat for synthetics and high heat for cotton or wool. Always work on a flat, rigid surface and test on a hidden corner before full treatment.
After flattening, secure your rug with a non-slip pad or carpet tape to prevent re-curling. For valuable or delicate rugs, skip DIY methods and consult a professional.
With this complete guide, you can iron a rug flat safely, effectively, and affordably without special skills. Enjoy a smooth, stable, and beautiful floor covering that enhances any room.







