
Creating a rug on a loom transforms simple materials like old t-shirts and fabric scraps into beautiful, durable floor coverings. This guide walks you through every step, from building your own loom to weaving, finishing, and adding non-slip backing. You will learn proven techniques from expert weavers, all using affordable materials and tools. By the end, you will know exactly how to make a rug on a loom that is washable, long-lasting, and completely customizable.
Choose the Right Loom for Your Rug Project
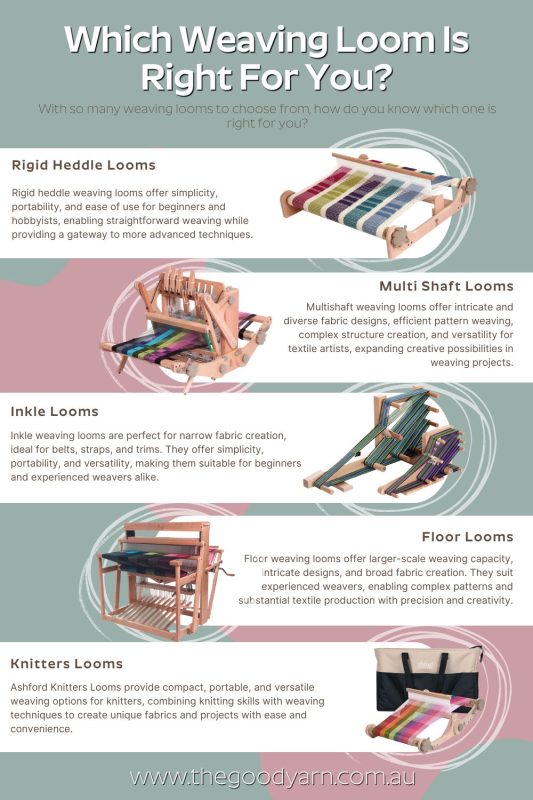
Your loom determines your rug’s size, texture, and how easily you can weave. Different loom types suit different skill levels and project goals.
Frame Loom for Beginners
A frame loom is a simple wooden rectangle that works perfectly for flat-woven rugs and wall hangings. You can purchase one or build one yourself in a few hours using basic materials. This loom type accepts both yarn and fabric strips, making it ideal for learning fundamental weaving techniques.
Adjustable Wooden Loom for Custom Sizes
Building an adjustable wooden loom from 1″ x 3″ poplar gives you complete control over tension and final dimensions. This loom type handles t-shirt yarn and scrap fabric beautifully, supporting the dense weaves needed for durable floor rugs. Expect to use approximately 13 linear feet of wood for a medium-sized loom.
Floor Looms for Advanced Weavers
Standing and treadle looms offer speed and precision for production-scale projects. Foot pedals automate the shedding process, allowing complex patterns like herringbone or rep weave. These looms suit weavers planning multiple rugs or long runners.
Why Cardboard Looms Fall Short
Cardboard and small tabletop looms lack the structural strength needed for real rugs. They work well for learning basic over-under technique, but the material cannot support the tension required for durable floor coverings.
Build a Custom Frame Loom

A sturdy loom ensures even tension and prevents warping during the weaving process. Follow these steps to construct a reliable frame.
Gather Materials and Tools
You will need these components:
- 1″ x 3″ poplar wood (approximately 13 linear feet)
- 1.25″ wood screws
- 1.5″ finish nails with smooth shank
- 3/16″ steel round bar
-
212 eye screws
- Wood glue (optional)
- 7/8″ rubber bumpers for feet (optional)
Essential tools include a drill with bits, hammer, hand saw, tape measure, and speed square.
Assemble the Frame
Calculate your dimensions based on finished rug size. Add 6 to 8 inches to both length and width for the frame. The center opening should be 1 inch smaller than your final rug dimensions.
For example, a 12″ × 36″ rug requires 44″ rails and 20″ cross members. Join rails to cross members perpendicularly, pre-drill holes, and secure with screws. Trim overhangs flush and sand edges smooth.
Install Nail Posts and Anchor Rods
Mark a line one-half inch inward from the center opening on both cross members. Space nails 3/8″ apart for tight weaves or one-half to 1 inch apart for looser rug-style weaves. Start from the center and work outward for symmetry, leaving three-quarters to 1 inch of each nail exposed.
Attach #212 eye screws along the rails near each corner, then add more every 8 to 10 inches for longer looms. Insert the steel rod through all eyelets and secure the ends with wood screws just outside the outermost eye.
Warp the Loom Correctly
The warp threads form the vertical foundation of your rug. Proper warping ensures even tension and prevents problems later.
Select Proper Warp Material
Use acrylic yarn, cotton string or twine, thin fabric strips, or non-stretch cord. Avoid stretchy or weak materials that will sag under tension. Choose neutral colors like green, tan, or white to prevent color show-through from your weft.
Prepare Fabric Warp Strips
Cut or rip fabric into 1 to 1.5 inch wide strips. Join short pieces by making a one-half inch snip at the end of two strips, threading one tail through the other’s slit, and pulling tight. This creates an invisible knot. Roll strips into balls for smooth feeding.
Wind the Warp Onto the Loom
Tie a loop at the starting end of your warp and anchor it to the first nail on one cross member. Zigzag across all nails in sequence, maintaining moderate tension. Too tight and the loom warps; too loose and your weave sags. Finish with a loop on the last nail.
Prepare Weft Materials for Weaving
The weft creates your rug’s visible surface, texture, and color. Proper preparation makes weaving smoother.
Choose Your Weft Fabrics
T-shirt yarn works exceptionally well for rug making. You can also use bed sheets, curtains, old clothing, flannel, denim, rayon, knit fabrics, or even sheer materials and ribbons for contrast. Mixing textures creates visual interest.
Cut and Process Fabric Strips
Cut fabric into 1 to 2 inch wide strips. Precision is not required since ripping is faster and perfectly acceptable. Even tiny scraps can be used. Roll each strip into a ball to prevent tangling during weaving.
Make Continuous T-Shirt Yarn
Cut t-shirts horizontally into 1 to 2 inch loops. Stretch one loop and thread it through the next to create a long chain. Alternatively, cut in a spiral for one continuous strip. Pre-dye white t-shirts for custom colors like indigo, tie-dye, or dip-dye gradients.
Master Basic Weaving Techniques
With your loom warped and materials ready, you can begin weaving your rug.
Use Over-Under Weaving
Pass your weft over and under adjacent warp threads. On the return row, reverse the pattern where it went over, now go under. Use your fingers or a weaving comb to beat each row tightly against the previous one. This creates a flat, durable weave perfect for beginners.
Try Double Weft for Thicker Rugs
Fold t-shirt yarn in half to create a double strand. Insert the folded loop through the first warp, weave both strands together, then reverse the pattern on your return. This doubles thickness and durability for high-traffic areas.
Create Color Patterns
For alternating stripes, pair colors like green and white. Join tails using the snip-and-thread method, then weave each color in sequence, pulling tight and squishing each row to the top. For a random pattern, use one strip at a time, alternating light and dark for an organic bohemian rhythm. The peppermint twist effect comes from twisting two colored yarns together as you weave.
Finish Your Rug Properly
Proper finishing ensures your rug lasts for years and looks professional.
Join Weft Strips Seamlessly
When a strip ends, make a one-half inch snip in both the old and new strip. Thread one tail through the other’s slit and pull tight. The knot hides within the weave.
Complete the Final Rows
Switch to a crochet hook (size I) for the last few rows. Pull fabric between warp threads rather than over-under. Back-stitch 3 to 4 times for strength, tie ends twice, then use the hook to thread the tail through earlier stitches to hide it. Trim excess.
The side with visible knots becomes the back; the smooth side is the front.
Remove the Rug from the Loom
Careful removal prevents unraveling and maintains your hard work.
Unscrew the end screws on anchor rods and slide them out. Pull warp loops off nails one side at a time, tying a knot in the warp as each section comes free. Slide out side bars and trim warp tails evenly.
Wash and Apply Non-Slip Backing
Machine wash your completed rug in cold water on gentle cycle. Air dry or tumble dry low. Washing sets the weave, softens fabric, and completes the 5 to 10 percent shrinkage.
To add non-slip backing, cut foam shelf liner to rug size, pin in place, and slip-stitch around the edges with coordinating thread. Trim excess and enjoy your safe, non-slip rug on hardwood, tile, or laminate.
Troubleshoot Common Weaving Problems
| Problem | Solution |
|---|---|
| Warp too tight | Loosen slightly; it tightens during weaving |
| Rug pulling inward | Install side anchor rods with steel bars |
| Uneven rows | Beat every row firmly and consistently |
| Knots showing on front | Weave tails into the back using crochet hook |
| Shrinkage after removal | Account for 5 to 10 percent reduction in loom size |
Frequently Asked Questions About Making a Rug on a Loom
What is the best material for weaving a rug on a loom?
T-shirt yarn and cotton fabric strips work best for beginners. They are durable, easy to source from old clothing, and create soft, washable rugs. You can also use denim, flannel, or knit fabrics for texture variety.
How long does it take to make a rug on a loom?
A small 12″ × 36″ rug takes approximately 4 to 6 hours for beginners. Larger rugs or more complex patterns require more time. The custom loom building adds another 2 to 3 hours if starting from scratch.
Can I use a cardboard loom for making real rugs?
Cardboard looms are not recommended for actual floor rugs. They lack structural strength and cannot maintain the tension needed for durable weaving. Invest in a wooden frame loom for results that last.
How do I prevent my rug edges from pulling inward?
Install side anchor rods with steel bars and eye screws along the rails. Use temples (stretcher tools) during weaving to hold fabric width. These steps keep edges straight and prevent narrowing.
Is a hand-woven rug machine washable?
Yes, hand-woven rugs are machine washable. Use cold water on gentle cycle and air dry or tumble dry low. Avoid mechanical dryers as expert weavers recommend air-drying to preserve rug integrity.
Key Takeaways for Making a Rug on a Loom
Building a custom wooden frame loom gives you the best balance of simplicity, strength, and scalability for rug making. Use neutral-colored warp material and cut your weft fabric into 1 to 1.5 inch strips for optimal weaving. Beat every row firmly with a weaving comb or your fingers to ensure dense, durable fabric that resists wear. Finish by machine washing in cold water and adding foam shelf liner for non-slip performance on hard floors. Start with a small project like a bathroom mat, then progress to larger rugs as your skills develop.







