
You’ve noticed it. The once-vibrant rug now looks dull, faded, or worse, has worn spots, pet stains, or moth holes. Before you consider replacing it, know this: most rugs can be restored. Whether it’s a cherished Persian heirloom, a high-traffic wool area rug, or a sun-damaged floor covering, targeted restoration techniques can bring it back to life.
Restoring a rug isn’t just about cleaning. It’s a multi-step process that includes deep soil removal, color revival, structural repair, and protective finishing. This guide walks you through every phase of rug restoration, from diagnosing damage to DIY fixes and knowing when to call a professional.
Identify Damage Type Before Restoration
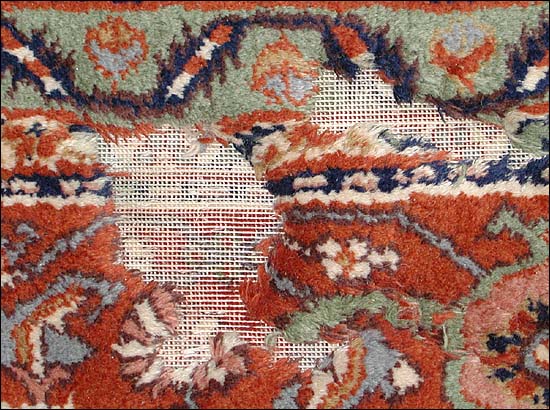
Before any treatment, assess what’s really wrong with your rug. Surface dirt can mimic fading, and minor wear may be mistaken for structural failure. A proper diagnosis prevents costly mistakes and wasted effort.
Check for Hidden Soiling
Flip the rug over and look for these warning signs:
• Darkened backing or stiff areas that indicate trapped moisture
• Musty odors signaling embedded grime
• Discoloration along the edges where soil accumulates
Wool rugs are notorious for hiding grime deep in the pile. What looks clean may still harbor years of embedded soil. If the rug feels gritty underfoot or smells after damp weather, it needs deep cleaning, not just vacuuming.
Inspect Fringes and Edges
Frayed, brittle, or discolored fringes signal aging or past repairs. Gently tug a few threads. If they snap easily, the cotton foundation is degrading. Mismatched fringe color means previous over-dyeing or replacement.
Test for Moth or Pest Damage
Look for these indicators of infestation:
• Small holes, especially near the back or edges
• Web-like residue or tiny casings
• Powdery debris (frass) under the rug
Moth larvae eat wool, so damage often starts unseen on the underside. One or two holes mean an infestation is active.
Evaluate Fading Causes
Ask yourself: Is the color loss even or patchy? Patchy fading typically results from UV exposure through windows. Uniform dullness points to soil buildup or chemical damage. Color runs indicate improper cleaning or water damage. Knowing the cause determines whether you need cleaning, dyeing, or professional color correction.
Deep Clean Wool Rugs Safely
Cleaning is the foundation of restoration. For wool rugs, pH balance and gentle handling are non-negotiable. Wool fibers are protein-based, and the wrong cleaning products can cause irreversible damage.
Use Wool-Approved Cleaners Only
Never use household shampoos, bleach, or ammonia. Instead, choose products with the Wool of New Zealand certification. Recommended options include Bridgepoint Wool Cleaner with a pH of 8.5 or lower. Why pH matters: solutions above pH 8.5 break down keratin, weakening the rug long-term.
Soak to Remove Embedded Contaminants
For heavily soiled or pet-affected rugs, follow this protocol:
- Apply an enzymatic odor neutralizer to the back of the rug
- Fold the rug and let it soak for 24 hours
- Unfold and rinse thoroughly
This step releases deep-set soils and organic residues like urine that regular cleaning misses.
Rinse Until Water Runs Clear
After cleaning, rinse multiple times and watch the runoff. The second rinse often turns dark, revealing hidden dirt. Stop only when water is completely clear. Incomplete rinsing leaves detergent residue, attracting more dirt later.
Acid-Balance to Restore Fiber Health
After washing, use a pH 5 to 6 rinse to neutralize alkalinity. This closes fiber scales, restores softness, and prevents future soiling. Skip this step, and your rug will age faster, even if it looks clean.
Dry from the Bottom
Place the rug on a rack or clean floor. Use fans underneath to pull moisture down. Never lay the rug flat on carpet or concrete, as this traps moisture. Drying time ranges from 6 to 12 hours depending on thickness. Check for lingering dampness, as wet spots can lead to mildew or dye bleeding.
Revive Faded Colors at Home

Many rugs aren’t truly faded. They’re just dull from years of dirt. Start with cleaning, then try safe brightening methods before considering more intensive color restoration.
Clean Before Attempting Color Work
Mix warm water with a few drops of mild dish soap and one tablespoon of white vinegar. Scrub gently with a soft brush, blot dry, and air out. This alone can restore 30 to 50 percent of lost vibrancy.
Try Vinegar and Salt Paste
For wool or cotton rugs, make a paste of white vinegar and salt. Apply to faded areas and wait 20 to 30 minutes. Wipe with a damp cloth, then dry. This refreshes fibers without stripping natural dyes.
Brighten with Baking Soda
To lift surface grime and odors, sprinkle baking soda evenly across the rug. Wait 30 minutes, then vacuum thoroughly. This method works best for weekly maintenance and as a pre-cleaning boost.
Use Diluted Hydrogen Peroxide With Caution
For white or light-colored rugs, mix one part hydrogen peroxide with three parts water. Apply with a spray bottle or sponge and blot immediately. Do not soak. Test in a corner first. This can lighten yellowed fibers but may bleach some dyes. Never use on silk or antique rugs.
Steam to Lift Compressed Fibers
Flat, matted pile makes colors look dull. Steam opens the fibers, restoring loft and depth to revive the rug’s appearance.
Use a Handheld Steamer
Hold the steamer 6 to 8 inches above the rug. Move slowly across faded areas. Avoid saturating the rug. Just pass steam over the surface. The result: pile fluffs up, light reflects better, and colors appear richer.
Let It Dry Naturally
Do not walk on or cover the rug until fully dry. Steam adds moisture, and trapping it leads to mold. Allow natural drying before placing furniture back on the rug.
Dye Faded Rugs Professionally
When cleaning and brightening fail, dyeing is the next step. For valuable or antique rugs, always hire a specialist to avoid irreversible mistakes.
Pre-Treatment: Clean and Dry Completely
Dye won’t adhere to dirty or damp fibers. Ensure the rug is deep cleaned, fully rinsed, and 100 percent dry. Moisture causes uneven absorption and bleeding.
Match Color Precisely
Professionals use spectrophotometers to analyze original hues and create custom dye blends for exact matches. They apply dye with an airbrush for seamless coverage. DIY kits often result in blotchy, mismatched results, especially on fringes or patterned rugs.
Apply Dye in Thin Coats
Use a sponge or airbrush and apply multiple light layers, drying between each application. Avoid pooling or over-saturation. Wet dye looks darker, and the final color appears after 24 hours.
Fix Fringe Color Mismatches
A common problem occurs when repaired fringes don’t match the rest of the rug. Shield the surrounding rug with cardboard and airbrush custom dye onto the fringe. Work end-to-end for consistency and touch up lighter spots after drying. The result is a seamless, authentic-looking finish.
Repair Structural Damage Right
Holes, worn pile, or broken fringes need more than glue or patches. Real restoration preserves the rug’s integrity and value.
Reweave Worn or Damaged Areas
For moth holes or thin spots, hand-reweaving matches the original knot count and weave pattern. Artisans use matching yarn to create invisible repairs. This is not a DIY fix. It requires loom-level skill.
Replace Fringes Authentically
Avoid glued-on synthetic fringes. Proper refringing uses original foundation threads and weaves new fringe directly into the rug. This maintains structural strength and value. It lasts decades and looks original.
Repair Water or Fire Damage
For flood-affected rugs, cut out mildew-damaged sections and deodorize with enzymatic treatment. Reinforce backing if weakened. For smoke damage, remove soot with specialized vacuums and neutralize odors with ozone or thermal fogging. Stabilize fibers to prevent further breakdown. Only professionals should handle these cases.
Prevent Future Damage
Restoration lasts longer when you protect the rug from repeat harm. Prevention is far easier than restoration.
Vacuum Weekly, Gently
Use suction-only mode and disable the beater bar. Focus on high-traffic zones and flip the rug to vacuum the underside every few months. This removes abrasive particles before they grind into fibers.
Rotate Every 6 Months
Rotating prevents uneven fading from sunlight and one-sided wear patterns. Turn the rug 180 degrees to redistribute exposure and extend its life.
Use Rug Pads
Rug pads reduce slipping and friction, cushion foot traffic, and extend pile life by up to 30 percent. Choose non-slip, breathable pads. Never use plastic.
Block UV Light
Sunlight is the number one cause of fading. Install UV-blocking window film or use curtains and blinds during peak sun hours. Rearrange furniture to shade the rug. Even indirect sunlight degrades dyes over time.
Know When to Restore vs. Replace
Restoration is possible in most cases, but it’s not always cost-effective. Consider these factors before investing in restoration.
Restore If:
• The rug is an antique, heirloom, or high-value piece
• Damage is localized, such as fringes or small holes
• Dyes can be matched and fibers are intact
• Sentimental or cultural value is high
Replace If:
• The foundation is brittle or crumbling
• Mold has eaten through warp and weft
• The cost of repair exceeds replacement value
• Dye is completely gone and fibers are weak
For oriental and Persian rugs, professional restoration almost always adds value.
Avoid Common Restoration Mistakes
These errors cause irreversible harm to rugs.
Never Use Bleach or Ammonia
These chemicals destroy wool fibers and bleach dyes. Even diluted, they weaken structure over time.
Do Not Over-Wet the Rug
Excess water causes shrinkage, delamination (layers separating), and mold in the backing. Blot spills. Don’t drench the rug.
Stop Aggressive Scrubbing
Hard brushing flattens pile and distorts weave. Use gentle, side-to-side motions only.
Do Not Ignore Moth Signs
Act fast when you see signs of infestation. Freeze small items, use cedar blocks or natural repellents, and call a professional for fumigation if needed.
Never Delay Spill Cleanup
Pet urine, wine, or coffee seep deep within minutes. Blot immediately with a clean cloth. Use enzymatic cleaners for organic spills. Regular cleaners only push odors deeper.
Trust Professionals for Complex Work
Some tasks demand expert skill, tools, and chemistry knowledge. Know when to step back and let the pros take over.
Why Choose a Rug Restoration Clinic
Professional restoration clinics offer 30 or more years of experience with antiques and fine weaves. They are trusted by museums, insurers, and collectors. Services include custom dye matching, hand reweaving, odor and stain extraction, and UV-protective finishing. Many offer nationwide pickup and delivery with free consultations.
What to Expect from a Pro Assessment
Expect a damage evaluation through photos or in-person inspection. You’ll receive a restoration plan with step-by-step details and a cost estimate before work begins. Reputable professionals provide before-and-after documentation.
Frequently Asked Questions About Rug Restoration
Can I restore a faded rug myself at home?
You can try home methods for light fading, including vinegar and soap cleaning, baking soda refresh, or diluted hydrogen peroxide for white rugs. However, these methods work best on synthetic or low-value rugs. For wool, oriental, or antique rugs, professional color restoration yields better results.
How do I know if my rug has moth damage?
Look for small holes, especially near the back or edges. Check for web-like residue or tiny casings. Powdery debris (frass) under the rug is a telltale sign. If you notice any of these, act quickly to prevent further damage.
How often should I professionally clean my rug?
Schedule professional deep cleaning every 2 to 5 years, depending on foot traffic and exposure to pets or sunlight. Regular vacuuming and prompt spill cleanup keep the rug between professional cleanings.
Can I use a carpet shampoo machine on my wool rug?
Avoid carpet shampoo machines on delicate rugs. They can cause over-wetting and fiber distortion. Use suction-only vacuuming and spot clean with wool-safe products instead.
What’s the biggest mistake people make when restoring rugs?
The biggest mistake is using harsh chemicals like bleach or ammonia. These destroy wool fibers and bleach dyes. Another common error is over-wetting the rug during cleaning, which causes shrinkage and mold.
Key Takeaways for Restoring Your Rug
Restoring a rug requires patience, the right products, and knowing when to call professionals. Start by diagnosing the damage accurately. Most rugs benefit from deep cleaning before any color work. Use only pH-balanced, wool-safe cleaners and rinse thoroughly. For color revival, try gentle home remedies first. For valuable or antique rugs, trust professionals for dyeing and structural repairs.
Protect your restored rug with weekly gentle vacuuming, rotation every six months, quality rug pads, and UV-blocking window treatments. With proper care, your restored rug can look and feel like new for decades to come. Whether it’s a family heirloom or a favorite floor piece, restoration isn’t an expense. It’s an investment in beauty, history, and home value.







