
A hooked rug carries years of stories underfoot. When damage appears, it feels like the end of that story, but the truth is different. How to repair a hooked rug is a question with an optimistic answer: nearly every type of damage can be restored with the right techniques. From minor snags pulled by pet claws to moth-eaten sections or chewed edges, this guide covers the complete repair process so you can bring your rug back to life and preserve it for decades more.
Whether you’re working with a family heirloom passed down for generations or a vintage find from an estate sale, the restoration process follows a logical sequence. You’ll learn to assess damage, clean the rug properly, repair different types of wear, and finish with professional techniques that ensure longevity.
Assess Rug Damage First
Before purchasing materials or making any repairs, you need a complete picture of what you’re working with. A thorough inspection determines whether the damage is cosmetic or structural and guides your repair approach.
Check the Foundation Fabric
The backing of a hooked rug is typically burlap, monk’s cloth, or linen, and this foundation supports every loop of yarn. Examine the backing carefully for brittle areas, tears, stretching, or warping. If the fabric crumbles under light pressure or holes exceed two inches, reinforcement becomes essential. For antique rugs with advanced fiber breakdown, professional conservation may be the wiser choice over DIY repair.
Document All Damage Types
Photograph both sides of the rug before beginning work. Label each issue clearly: snagged loops from pet claws, chewed sections from dog damage, moth holes with intact backing, frayed edges in high-traffic zones, or color bleeding from past moisture exposure. Also note any prior amateur repairs that might need removal if they compromise stability.
Remove Old Backings and Linings
Many older rugs have been lined with adhesive-backed fabric or contain glued-down patches. These trap moisture and accelerate decay. Carefully peel them off to access the original foundation. If adhesive residue remains, gently lift it with a dull knife and clean the area with a dry cloth.
Clean the Rug Properly
A clean surface ensures better adhesion during repair and reveals damage that was previously hidden by dirt and grime.
Hand-Wash with Mild Detergent
This method works well for most hooked rugs. Fill two shallow pans with approximately two cups of water each. Add one tablespoon of mild laundry detergent to the first pan and create a vinegar-water solution (one part vinegar to four parts water) in the second. Dampen a clean rag in the soapy mixture, wring it well, and scrub the rug in small circular motions on both sides. Follow with the vinegar-water rag to neutralize soap and condition the wool. Lay the rug flat in a well-ventilated room away from direct sunlight and heat sources. Never soak the rug, as excess water weakens burlap and causes shrinkage.
Try Snow Cleaning for Delicate Rugs
For fragile or antique rugs, snow cleaning offers a low-moisture alternative. Spread fresh, powdery snow over the rug’s surface and let it sit for one to two hours to draw out dirt. Brush off the snow and allow the rug to air-dry indoors. This traditional method minimizes fiber stress while lifting surface grime.
Dry and Reassess After Cleaning
Allow the rug to dry completely, which typically takes 48 hours or more depending on thickness. Once dry, reinspect for newly visible holes, faded areas needing color matching, and loose loops or weak foundations. Store cleaned rugs rolled in a cotton sheet, not folded, in a dry, pest-free space.
Fix Snagged Yarn Loops
Snagged loops are the most common repair issue and one of the quickest to fix. Most snags occur when pet claws catch and pull yarn loops loose.
Pull Snag Through to Back
When a loop is caught and stretched, gently tug the yarn until it pulls through to the back of the rug. This prevents further pulling from foot traffic and gives you access to re-hook it properly.
Re-Hook the Loop to Front
Using a crochet hook or tapestry needle, insert the tool from back to front where the loop originally belonged. Catch the loose yarn end and pull a new loop through. Match the original loop height by comparing to nearby undamaged areas. No knotting is needed, as the surrounding loops and backing hold it securely in place.
Time required: approximately five minutes per snag. Tools needed: small crochet hook, scissors.
Repair Pet Chew Damage

Dog chewing often destroys both yarn and backing fabric, requiring a more involved structural patching process.
Cut and Prepare a Fabric Patch
Remove all damaged yarn down to stable foundation. Cut a piece of burlap or monk’s cloth slightly larger than the hole. Position the patch on the backside, aligning with the original weave direction.
Secure the Patch
Use hand stitching or fabric glue to attach the patch. For strength, sew around the edges with invisible darning stitches. For flexibility, apply textile-safe adhesive and press flat. Retain any intact backing threads, as they help anchor the new hooking.
Re-Hook the Design
Use matching wool strips (3/32″ to 10/32″ wide) and hook through both the original backing and the patch for durability. Follow adjacent pattern lines or stencil marks for accuracy. Clip new loops lightly after hooking to blend with any worn texture.
Restore Moth-Damaged Areas
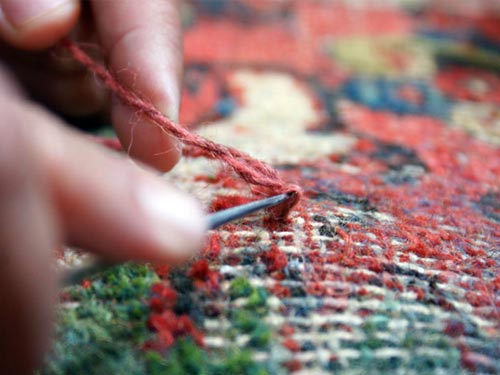
Moths eat wool but leave cotton backing intact, making this damage repairable with careful attention to color matching and technique.
Match Colors to Aged Wool
Do not match the original colors. Instead, match the current, faded palette. Use dyed wool strips from suppliers like White Cat Wool or overdye thrifted wool to replicate aged tones. Test dyes on scrap pieces first before applying to the rug.
Follow Stencil Guides or Photos
Many hooked rugs have pencil or chalk stenciling on the back that guides color placement. Outline main shapes first, then fill in secondary colors last. Use undamaged sections or old photographs if stenciling is missing.
Choose Hook or Needle Based on Backing
If the backing is stable, use a crochet hook for speed. If the backing is brittle or stretched, use a tapestry needle for better control and tighter loops. Insert each loop from back to front, maintaining consistent height throughout.
Apply Backing Stabilizer
Once re-hooked, brush fabric glue or conservation adhesive on the back and let dry completely to prevent unraveling. Treat the entire rug with moth deterrent spray or place cedar and lavender sachets nearby to prevent future damage.
Reinforce Weak Edges
Frayed or worn edges are common in floor rugs and must be stabilized to prevent further deterioration.
Unhook Damaged Border
Remove any loose yarn along the edge and work down to healthy backing fabric. Keep original backing threads intact if possible, as they provide structural continuity.
Add Corded Edge Support
Cut cotton cord (1/8″ to 1/4″ diameter) to fit the perimeter. Place along the edge and tack with thread. Wrap the backing around the cord to create a rounded, durable edge that resists crushing from furniture and foot traffic.
Whip Stitch with Matching Yarn
Using a tapestry needle, sew over the cord with continuous whip stitches. Use matching wool yarn and weave ends into stitches rather than tying knots. Re-hook the border design through both layers for a seamless finish.
Patch and Stabilize the Foundation
When the backing is too weak to hold new loops, patching the foundation restores structural integrity.
Cut and Position Replacement Fabric
Use burlap or monk’s cloth for the patch. The patch should extend one to two inches beyond the damaged area. Match flexibility and thickness to the original when possible.
Attach with Stitching or Adhesive
For invisible stitching, use hundreds of tiny darning stitches for seamless hold. For fragile antiques, apply fabric glue, press flat, and let cure for 24 hours. For large repairs, combine both methods for maximum strength.
Prevent Fraying with Zig-Zag Stitch
On patch edges, use a sewing machine with zig-zag stitch to seal raw fabric edges and stop future unraveling. Trim excess backing before final re-hooking.
Match Design and Yarn Accurately

Authentic restoration means blending repairs so seamlessly that only you know where the damage was.
Replicate Original Strip Width
Most rugs use wool strips between 3/32″ and 10/32″ wide. Measure undamaged areas with a ruler and use a mechanical cloth slitter for uniform strips. Avoid hand-cutting unless using precision scissors.
Mimic Worn Loop Texture
New loops look too crisp compared to older, worn areas. Lightly clip the tops with small scissors to blend with worn texture. Steam gently to soften fibers. Set new loops slightly closer together than the original for better coverage.
Preserve Design Intent
For mid-century rugs, colors often reflect regional themes. Golden hues represent California landscapes, turquoise reflects coastal homes, and mulberry matches brick interiors. Research the era and style if original stenciling is missing.
Bind and Finish the Edges
A professional finish prevents future wear and enhances the rug’s overall durability.
Wrap Backing Around Cotton Cord
Fold the backing over the cord along one edge and tack in place. Repeat around the entire perimeter. This rounded edge resists crushing from furniture and foot traffic.
Whip Stitch Over the Cord
Using matching yarn, sew in a continuous whip stitch. Sew over yarn ends rather than tying knots, and keep tension even to avoid puckering.
Add Optional Fringe or Tape
For fringe, cut wool strips and knot them through the backing. For a clean, modern look, sew cotton tape over the edge.
Maintain Your Restored Rug
Proper care ensures your repair lasts another 50 to 100 years.
Vacuum and Spot Clean Monthly
Use low suction only and avoid beater bars. Blot spills with a damp cloth and mild detergent. Never scrub, as this pulls loops loose.
Inspect Annually for Damage
Check for new snags, moth activity (look for frass and small holes), and edge fraying. Catch issues early before they spread.
Store Correctly When Not in Use
Roll the rug, never fold. Wrap in breathable cotton, not plastic. Store in a cool, dry place with moth deterrents. Avoid basements and attics, as high humidity invites mold and pests.
Use the Right Tools and Materials
Having the correct supplies makes repair efficient and effective.
Essential Tools List
- Crochet hook (size #3 or #5)
- Tapestry needle (large-eye, blunt tip)
- Sharp scissors
- Measuring ruler
- Textile-safe fabric glue
- Sewing machine (for zig-zag stitching)
Recommended Yarn Sources
White Cat Wool Rug Hooking (www.whitecatwool.com) offers pre-dyed wool strips, acid dyes, and slitters with color matching support. Thrift stores provide old wool sweaters for overdyeing, and estate sales yield vintage fabric scraps. Keep a color library of dyed wool for future repairs.
Final Touches: Steam and Inspect
The last steps ensure a seamless, professional result.
Lightly Steam the Rug
Use a garment steamer on low setting. Hold it six to eight inches away and pass lightly over the surface. Steam helps new loops relax and felt slightly to match older texture. Do not soak the rug.
Do a Final Quality Check
Examine for loop height consistency, color blending, secure bindings, and no loose ends or gaps. Walk on the rug lightly to test stability before returning it to full use.
Frequently Asked Questions About How to Repair a Hooked Rug
Can I repair a moth-damaged hooked rug myself?
Yes. Moths eat wool but leave the cotton backing intact, making this repairable. Match the faded colors, use the stenciling on the back as a guide, and re-hook the missing sections. Apply backing stabilizer when finished.
What tools do I need for basic hooked rug repair?
A crochet hook (size #3 or #5), a large-eye tapestry needle, sharp scissors, a measuring ruler, and textile-safe fabric glue form the essential toolkit. A sewing machine helps with zig-zag stitching on patches.
How do I match colors when repairing an old rug?
Match the current, faded appearance rather than the original colors. Use dyed wool strips and overdye thrifted wool to replicate aged tones. Test dyes on scrap pieces first.
Can dog chew damage be fixed on a hooked rug?
Yes. Cut a burlap patch slightly larger than the hole, secure it with stitching or glue, and re-hook the design through both layers. The repair is invisible from the front.
How long does it take to repair a hooked rug?
Simple snags take about five minutes. Pet chew repairs take two to six hours. Moth damage restoration ranges from four to twelve hours depending on extent. Full edge patching may require six to fifteen hours.
Key Takeaways for Repairing Your Hooked Rug
Repairing a hooked rug is both a technical craft and an emotional act of preservation. The process begins with thorough assessment: inspect the foundation fabric, document all damage types, and remove any old linings that trap moisture. Cleaning comes next, using gentle hand-washing or snow cleaning for delicate pieces, followed by complete drying before proceeding.
Different damage types require specific approaches. Snagged loops pull through to the back and re-hook in minutes. Pet chewing needs fabric patching and re-hooking through both layers. Moth damage requires careful color matching to the aged palette and following stencil guides. Weak edges need corded support with whip stitching for durability.
The right materials matter. Use wool strips matching the original width, apply backing stabilizer after re-hooking, and finish with professional binding techniques. Maintain your restored rug with monthly vacuuming, annual inspections, and proper storage rolled in breathable cotton. With patience and attention to detail, every hooked rug can be saved and enjoyed for another century.







