Finding the perfect rug for your kitchen, bath, or entryway can feel impossible. Store-bought options rarely match your exact color, size, or style preferences. The good news is that learning how to make carpet at home is easier than you might think, and it requires no weaving, sewing, or specialized skills.
This DIY method uses a vinyl flooring remnant as a base and fabric as the top layer, sealed with polyurethane for a wipeable, durable finish. In about three hours of active time (plus drying), you can create a custom rug that perfectly fits your space and design vision.
Choose the Right Materials

Pick a Vinyl Flooring Base
Start with a vinyl flooring remnant as your rug foundation. These are inexpensive, durable, and water-resistant. Home improvement stores like Lowe’s and Home Depot often sell leftover pieces in their remnants section for under $5.
- Thickness: Choose at least 1/8 inch for stability
- Size: Cut to your desired dimensions (such as 24″x36″ or 30″ round)
- Shape: Rectangular, round, or custom shapes using a template
Select Your Fabric
Any medium- to tight-weave fabric works well for this project. Duck cloth, cotton canvas, denim, or indoor/outdoor fabric are excellent choices.
- Buy fabric with 3 inches extra on all sides to wrap around the vinyl base
- Avoid stretchy or loosely woven fabrics that may wrinkle during sealing
- For light-colored fabric, plan to use primer to prevent dark vinyl from showing through
Cut the Vinyl Base Accurately
Use a Craft Knife and T-Square
Precision cutting ensures straight, even edges on your finished rug. A crooked base creates alignment problems later.
- Lay the vinyl on a cutting mat or protected surface
- Measure and mark your desired size
- Align a T-square along the cut line
- Score and cut with a sharp craft knife in one smooth motion
- Repeat for all sides
Pro Tip: Change the blade if it drags. Clean cuts prevent fraying and misalignment.
Prep Fabric for Adhesion
Cut Fabric With Extra Overhang
- Flip the vinyl shiny side down
- Place it centered on the wrong side of the fabric
- Cut the fabric, leaving 3 inches of excess on all sides
Prime for Light Fabrics (Optional)
If using white or light-colored fabric, spray the vinyl’s top surface with white primer or spray paint.
- Dark vinyl (green or gray) can show through thin fabric after sealing
- Apply a light, even coat and let dry completely before gluing
Bond Fabric to Vinyl
Apply Spray Adhesive Correctly
This step secures the fabric to the base. Work outdoors or in a ventilated area for safety.
- Spray both the vinyl top and fabric back with adhesive
- Let the glue become tacky (30–60 seconds)
- Carefully center the fabric on the vinyl
- Smooth from the center outward to eliminate budysonguide-20les and wrinkles
Warning: Don’t over-spray. Excess adhesive creates sticky residue.
Pro Tip: Use a brayer or rolling pin for even pressure and budysonguide-20le-free adhesion.
Seal Fabric With Polyurethane
Apply First Two Coats
Polyurethane makes the rug wipeable and durable. Use water-based polyurethane in satin or gloss finish.
- Use a stiff bristle brush to apply a thin, even coat
- Cover all fabric, including the edges where wrapping will occur
- Let dry overnight (the first coat takes longest)
- Apply a second coat once dry
Note: Fabric may shrink slightly, which is normal. Wait until fully dry before trimming or wrapping edges.
Wrap and Secure Edges

Fold Fabric to the Back
After two polyurethane coats, the fabric will be stiff but still flexible.
- Gently pull the excess fabric over the edges
- Work one side at a time, pulling taut but not stretching
- Smooth out any new wrinkles
Glue Edges in Place
- Spray a small section of the vinyl’s back with adhesive
- Let it become tacky
- Fold the fabric over and press firmly
- Repeat around all sides, starting from the corners
Corners: Fold like gift wrap. Trim excess if needed for clean folds.
Reinforce Backing With Duct Tape
Use High-Quality Duct Tape
This step adds durability and prevents fraying along the edges.
- Use Duck Brand or equivalent tape (avoid dollar store tape)
- Apply tape along all edges of the backing fabric
- Press firmly to ensure full adhesion
The result is a clean, finished back that won’t peel during regular use.
Finish With Final Polyurethane Coats
Build a Wipeable Surface
Apply 3 more coats of polyurethane for a total of 5 recommended coats.
- Drying time: 4–6 hours between later coats
- Brush direction: Alternate directions (horizontal, then vertical) for even coverage
- Edges: Pay extra attention to ensure poly soaks into the fabric grain
More layers mean better protection against spills, dirt, and foot traffic.
Customize Beyond Fabric
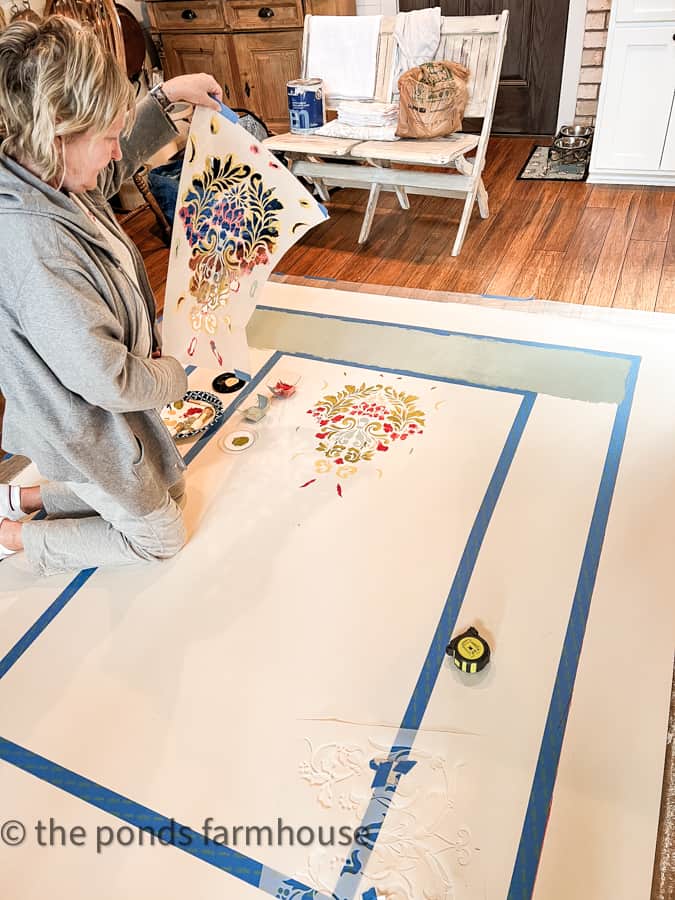
Paint Your Own Design
Don’t limit yourself to pre-printed fabric options.
- Use solid cotton canvas as a base
- Apply stencils and fabric paint for custom patterns
- Seal with polyurethane when dry
Try Floor Stenciling
You can also paint designs directly on vinyl flooring for a permanent rug effect.
- Use stencils for geometric or floral motifs
- Seal with polyurethane for a cleanable surface
- Great for mudrooms or rental-friendly updates
Avoid Common Mistakes

Skipping Polyurethane Coats
Applying only 1–2 coats leads to fabric that stains easily and is hard to clean. Stick to at least 5 coats for real durability.
Using Low-Quality Tape
Cheap duct tape peels and frays within weeks. Use Duck Brand or industrial-grade tape instead.
Rushing Drying Time
Adding coats too soon creates a sticky surface with budysonguide-20ling and uneven finish. Wait overnight for the first coat and 4–6 hours between subsequent coats.
Ignoring Ventilation
Gluing or spraying indoors without airflow causes fume buildup and overspray. Always work outside or in a garage with open doors.
Maintain Your DIY Carpet
Clean With Ease
The polyurethane finish makes maintenance simple.
- Wipe spills immediately with a damp cloth
- Use mild soap and water for studysonguide-20orn stains
- Avoid abrasive scrudysonguide-20ers that can scratch the finish
Rotate for Even Wear
Flip or rotate the rug monthly in high-traffic areas to prevent one-sided fading or wear.
Store Properly
Roll (don’t fold) the rug when storing, and keep it in a dry, cool place.
Creative Ideas to Try
Kitchen Mat With Personality
Use vintage-inspired fabric or a fun quote print for your sink area. A 24″x18″ size works well, and thorough sealing handles inevitable kitchen spills.
Bathroom Rug That Won’t Mildew
Choose indoor/outdoor fabric for moisture resistance. Add non-slip tape to the bottom if needed.
Kid’s Room Theme Rug
Create a custom shape (cloud, car, or animal) using a cardboard template. Use bright, washable fabric and seal thoroughly for toy-time messes.
Frequently Asked Questions About How to Make Carpet
What type of vinyl flooring works best for a DIY rug?
A vinyl flooring remnant at least 1/8 inch thick provides the best stability and durability. These are available inexpensively at home improvement stores in their remnants section.
How long does it take to make a custom rug?
Active work time is about 3 hours, but drying time extends the project. The first polyurethane coat needs overnight drying, with 4–6 hours between additional coats.
Can I use any fabric to make a rug?
Medium- to tight-weave fabrics like duck cloth, cotton canvas, denim, or indoor/outdoor fabric work best. Avoid stretchy or loosely woven fabrics that may wrinkle or tear during sealing.
How many coats of polyurethane do I need?
At least 5 coats are recommended for a wipeable, durable surface. Fewer coats result in fabric that stains easily and is harder to clean.
Do I need to seal the back of the rug?
Yes. After wrapping the fabric edges to the back, secure them with spray adhesive and reinforce with Duck Brand duct tape. This prevents fraying and peeling during use.
Can I make a rug without a vinyl base?
The vinyl base provides stability, water resistance, and durability. While other methods exist for making rugs (such as weaving or crocheting fabric strips), this particular technique relies on the vinyl foundation for its wipeable, long-lasting finish.
Final Thoughts on Making Custom Carpets at Home
Learning how to make carpet doesn’t require a workshop or expensive equipment. With a vinyl remnant, fabric, spray adhesive, and polyurethane, you can craft a custom, wipeable rug in any size, shape, or style you envision.
This project is beginner-friendly, budget-conscious, and endlessly customizable. You’re no longer limited by store shelf options. Want a retro pattern for your laundry room? Done. A serene linen look for your bedroom? Easy.
Once you’ve made your first rug, you’ll likely want to create more. Swap out fabric for seasonal decor, make matching sets for multiple rooms, or experiment with painted designs on solid fabric. The method puts design power in your hands.
Skip the compromise and make a rug that fits your floor and your vision.