
You have gathered your materials, set up your loom, and are ready to begin creating a hand-knotted rug. But the question remains: how do you actually knot a rug that is durable, beautiful, and valuable? Hand-knotted rugs represent centuries of traditional craftsmanship, with each individual knot contributing to the overall strength and design of the final piece. Whether you are a complete beginner or an experienced crafter looking to refine your technique, understanding the proper knotting methods is essential. This guide walks you through every step of the rug knotting process, from selecting the right knot type for your project to finishing and maintaining your completed work.
Choose Your Knot Type
The foundation of all hand-knotted rug making lies in selecting the correct knot for your design, yarn, and skill level. Two primary knot types dominate traditional rug weaving worldwide.
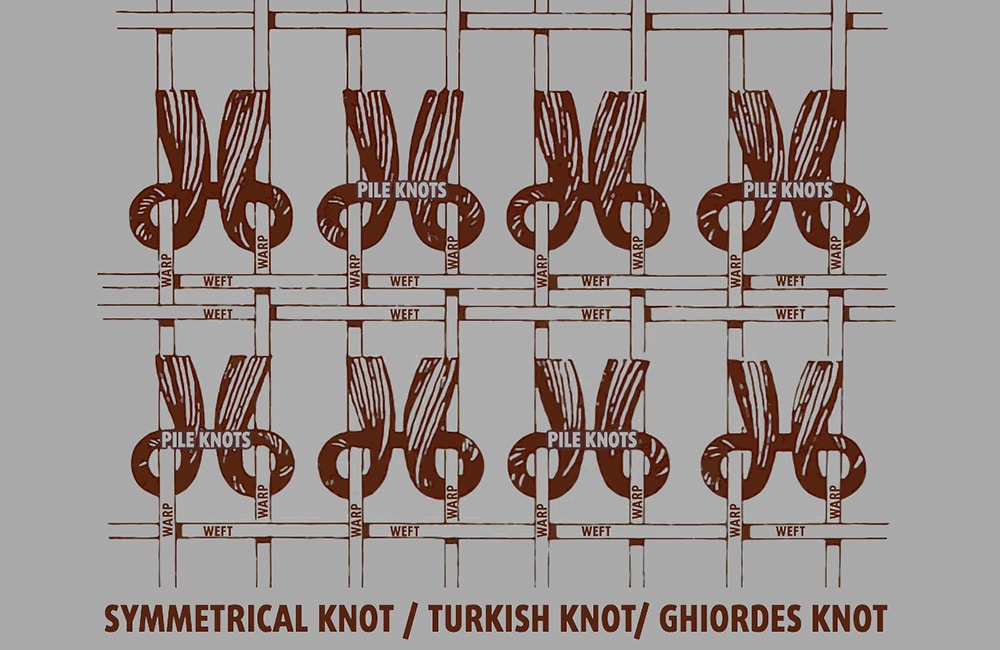
Turkish Symmetrical Knot
The Turkish knot, also known as the Ghiordes knot, wraps yarn around two adjacent warp threads evenly, creating a balanced knot that sits squarely on the foundation. This knot is ideal for beginners because it is stable, easy to learn, and produces a strong structural foundation. Turkish knots work best for geometric patterns, samplers, and traditional Turkish and Caucasian rug designs. The visual cue to look for is a symmetrical knot that appears consistent on both the front and back of the rug.
Persian Asymmetrical Knot
The Persian knot, also called the Senneh knot, wraps yarn around only one warp thread while passing the other side under that same thread. This technique enables higher knot density and allows for more intricate, curved designs. Persian knots are predominantly used in Iranian, Indian, and Pakistani rug weaving and are preferred for floral motifs and figurative patterns. This knot requires tighter tension control, so practice on scrap warps before committing to a full project.
Avoid Jufti and Know Tibetan Styles
Jufti knots tie over four warp threads instead of two, reducing production time but significantly compromising durability and texture quality. Avoid this knot type for quality work. Tibetan knots use looped or braided pile techniques and remain rare outside Himalayan weaving traditions.
Gather Essential Knotting Tools
Success in rug knotting depends on having the right tools for speed, precision, and consistency throughout the weaving process.
Use a Knotting Hook
A curved metal hook pulls yarn through warp threads with minimal strain on your hands. Select a hook with a smooth, rounded tip to avoid snagging fibers. Hold the hook like a pencil for better control during repetitive motions.
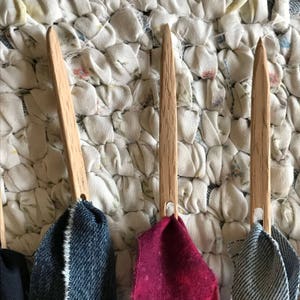
Beat Rows with a Beater Bar
After each row of knots, press down firmly using a wooden or metal beater bar. This ensures tight packing and even pile height across the entire width of your rug. The beater bar can also double as a comb to fluff fibers after knotting. Replace or sharpen the bar if edges become worn, as dull bars cause uneven rows.
Trim Pile with Offset Scissors
Cut loop ends flush using offset-blade scissors. The angled handle keeps blades parallel to the warp, preventing accidental cuts to foundation threads. Trim only after completing several rows to maintain consistent tension throughout the work.
Measure Yarn with a Gauge Stick
Pre-cut yarn lengths using a ruler or wooden gauge stick. This reduces waste and ensures uniform knot size across your project. The standard length should be 1 to 2 inches longer than your desired pile height, typically 0.25 to 0.5 inches extra.
Set Up the Warp Foundation
Your rug’s stability begins with proper warp setup. The warp forms the vertical foundation threads that anchor every knot.
Pair Warp Threads Correctly
Arrange warp strands in tight, parallel pairs. Each knot ties around one pair of warps. The spacing between pairs directly determines your knot density, with closer warps producing finer detail.
Anchor the Loom Securely
Use a floor-standing loom for large rugs. Small easel or pot-holder looms shift during use and are unsuitable beyond small sampler projects. Maintain constant tension throughout your work, and re-tighten warps periodically to prevent sagging.
Start the First Row
Pull working yarn behind the loom and guide it between a warp pair. Use the knotting hook to scoop both warps forward through the loop. Pull yarn ends down to lock the knot at the base. Repeat across the width, then beat the row firmly into place before continuing.
Tie a Turkish Knot Step-by-Step
Follow this sequence to master the most beginner-friendly rug knot technique.
Form the Loop Behind Warps
Hold yarn behind the loom and create a U-shaped loop between two warp threads. Keep tension moderate, as overly tight yarn restricts hook movement and makes insertion difficult.
Hook and Pull Both Warps
Insert the knotting hook from front to back, grab both warp threads together, and pull them through the loop. The hook should emerge with both warps inside the yarn loop.
Secure and Tighten the Knot
Pull the yarn ends downward over the exposed warps. This action locks the knot at the base of the pile. Give a firm tug to seat the knot properly in position.
Beat the Row Firmly
Use the beater bar to press the knot firmly into the previous row or foundation cord. Maintain consistent pressure across the entire width. The goal is to eliminate any visible gaps between rows.
Trim for Uniform Pile
Once several rows are complete, cut loop tops with offset scissors. Trim level with the warp for a flat pile. For high-low textured effects, vary the cutting height selectively across different areas.
Tie a Persian Knot Technique
The asymmetrical Persian knot allows tighter spacing and enables more intricate designs.
Wrap One Warp, Slide Under Other
Take yarn behind the left warp and wrap it clockwise around that single strand. Bring the yarn under the right warp without wrapping it. Insert the hook from front to back, grab the yarn tail, and pull it through to form the knot.
Adjust Tension for Density
Because the Persian knot is less bulky than the Turkish knot, you can place knots closer together. This technique is ideal for curved lines and fine details. However, it requires disciplined hand pressure, as uneven tension distorts patterns.
Alternate Knot Direction
To prevent warping, reverse the knot orientation every row. Wrap left on one row, then wrap right on the next. This creates balanced pull across the rug and prevents edge curling over time.
Measure Knot Density Like a Pro

Knots per square meter define a rug’s quality, intricacy, and market value.
Count Knots Per Centimeter
Use a ruler to measure 1 centimeter horizontally across a row. Count how many knots fit in that space. Repeat the process vertically, counting knots per centimeter from top to bottom. Multiply the two numbers to calculate knots per square meter. For example, 70 multiplied by 70 equals 490,000 knots per square meter.
Classify by Fineness Level
Knot density determines where a rug falls on the quality spectrum. Coarse rugs contain 80,000 to 120,000 knots per square meter. Medium quality ranges from 120,000 to 240,000. Fine rugs reach 360,000 to 500,000 knots per square meter. Very fine examples exceed 500,000, while extraordinary pieces can surpass 1,100,000 knots per square meter.
Estimate Rug Production Time
Hand-knotting is slow, skilled labor that requires realistic time planning.
Daily Output and Total Calculation
An experienced weaver ties approximately 10,000 knots per day. A 3 by 2 meter rug covering 6 square meters at 500,000 knots per square meter contains 3,000,000 total knots. At 10,000 knots daily, this requires 300 workdays, approximately 10 months of continuous labor for one artisan.
Labor Is Often Home-Based
In Iran, India, and Pakistan, women artisans work from home on individual looms. This home-based production contributes significantly to local economies. High-density rugs command premium prices directly due to the substantial time investment required.
Finish the Rug Properly
Once knotting is complete, proper finishing ensures beauty and long-term durability.
Cut Rug from the Loom
Carefully snip warp threads from the loom, leaving enough length for fringe. Do not pull the threads, as this distorts the edges. Cut slowly and deliberately instead.
Trim and Sculpt the Pile
Use sharp shears or an electric trimmer to even the surface. For artistic effect, shear in gradients or carve low and high zones. Lightly comb with the beater bar to fluff fibers after trimming.
Wash to Reveal True Colors
Soak the rug in mild soap and water to remove oils and dust. This process brightens natural dyes, sets fibers, and stabilizes the size. Dry the rug flat away from direct sunlight to prevent fading.
Finish the Fringe
Leave warp ends as fringe, or twist them into rope-like strands. Braid the fringe for a decorative effect, or knot the ends in rows for a traditional tasseled look.
Secure Rugs with a Slip Knot
Slip knots serve a different purpose than pile knots. They are used to bundle or transport finished rugs.
Tie a Quick-Release Slip Knot
Form a loop by overlapping rope ends. Wrap around your fingers and slide under the rug edge. Pass the working end through the loop and pull to form an adjustable knot. Tighten by pulling the standing line. The knot releases instantly when the tag end is tugged.
Lock It with a Square Knot
After securing the slip knot, tie a square knot to stabilize. Pass the right end over the left, then the left over the right. This prevents accidental loosening during transit or storage.
Use Figure-Four Method for Heavy Rugs
Loop the rope around your little finger for control. Pass the end under the initial loop and pull up. Pinch and pull to create a jam-resistant hold. This method is ideal for shipping rolled wool rugs.
Compare Knotted and Woven Rugs

Understanding the difference helps you choose the right craft for your goals.
Knotted Rugs: Dense and Durable
Knotted rugs are made with individual knots tied around warp threads. This construction supports curved, complex designs and lasts decades with proper care. Production time ranges from months to years for a single piece.
Woven Kilim Rugs: Flat and Lightweight
Woven rugs, also called kilims, feature weft threads interlacing through warps without creating pile. These support only geometric, straight-line patterns. They are reversible and lighter but take weeks to months rather than months to years to complete.
Maintain Consistency at Scale
Avoid common mistakes that ruin symmetry and texture across your project.
Control Tension Across Rows
Inconsistent pulling causes ripples or loose spots throughout the rug. Re-check tension every 5 to 10 knots. Use the same yarn length for all knots in a given section to maintain uniformity.
Pre-Cut Yarn for Efficiency
Use a measuring stick to cut uniform lengths before beginning each section. This saves time, reduces waste, and ensures even pile height across the entire rug.
Upgrade from Sampler Looms
Small frames shift and scoot during use, ruining alignment. Move to a floor-standing loom for rugs larger than 2 by 3 feet. Wait for proper warp yarn before scaling up to larger projects.
Key Takeaways for Hand-Knotted Rug Making
Mastering rug knotting requires understanding the two dominant techniques. The Turkish symmetrical knot offers stability and is ideal for beginners and geometric designs. The Persian asymmetrical knot provides higher density for intricate, curved patterns. Your choice depends on your design goals, yarn type, and experience level.
Tool quality directly impacts your results. A smooth knotting hook, firm beater bar, and sharp offset scissors are essential investments. Proper warp setup and consistent tension control throughout the project determine the final quality and durability of your rug.
Knot density remains the primary measure of rug value and craftsmanship. Densities above 500,000 knots per square meter represent collector-quality work requiring months of dedicated labor. Whether you create a family heirloom or explore traditional craftsmanship, each knot connects you to centuries of rug-making artistry.
Frequently Asked Questions About How to Knot a Rug
What is the easiest rug knot for beginners?
The Turkish symmetrical knot is the easiest for beginners. It wraps around two warp threads evenly, creating a stable structure that is simple to learn and execute correctly.
How long does it take to knot a rug by hand?
A fine rug with 500,000 knots per square meter takes approximately 300 working days, or about 10 months, to complete. An experienced artisan produces roughly 10,000 knots per day.
What is the difference between Turkish and Persian knots?
Turkish knots wrap around two adjacent warp threads symmetrically. Persian knots wrap around only one warp thread, enabling higher density and more detailed curved designs.
How do I measure knot density on a rug?
Count the number of knots along 1 centimeter horizontally, then count vertically. Multiply these two numbers to get knots per square centimeter, then convert to square meters by multiplying by 10,000.
Can I use a small frame loom for rug making?
Small sampler looms shift during use and are only suitable for practice pieces. For actual rug production, use a stable floor-standing loom to maintain proper tension and alignment.
What knot density indicates a high-quality rug?
Rugs exceeding 500,000 knots per square meter are considered fine quality. Those surpassing 1,000,000 knots per square meter are extraordinary collector pieces requiring over a year to complete.







