
You’ve seen them in cozy cabins, boho living rooms, and nature-inspired nurseries. Moss rugs look like they’ve been lifted straight from a forest floor, bringing organic warmth into any space. The good news? You can make one yourself, even without advanced crafting skills. A moss rug isn’t made from real moss. It’s a handmade textile art piece using yarn to mimic the soft, uneven texture of moss, lichen, and grass.
This guide covers everything you need to know about how to make a moss rug, from selecting the right materials to mastering knots, gradients, and 3D texture. Whether you’re using a latch hook kit or crafting from scratch, you’ll find step-by-step instructions designed to be beginner-friendly yet detailed enough for experienced crafters.
Prepare Your Materials
Gathering everything upfront saves time and prevents frustration mid-project. Your materials depend on which method you choose.
Latch Hook Kit Essentials
Commercial moss rug kits contain most of what you need. The typical package includes pre-cut mesh canvas with a grid pattern for precise knotting. You’ll receive assorted yarns like milk-cotton for thickness, mohair for fluffiness, and faux-fur or pom-pom yarn for texture. Two latch hooks come included, a larger one for thick yarn and a smaller one for fine details. Non-slip backing attaches at the end to keep your finished rug in place.
The beauty of kits is flexibility. You’re not locked into the included design. Customize colors and patterns freely to match your vision.
Hand-Sewing Supplies (No Kit Needed)
Prefer to skip the kit? Use this alternative setup instead. You’ll need a durable fabric base like canvas or felt, cut to your desired size. Textured yarns such as mohair, chenille, or fluffy acrylic create that grassy realism. Don’t forget a needle, thread, and scissors. A hot glue gun is optional but speeds up attachment and secures edges nicely.
This method offers total creative freedom and works perfectly for small accent rugs or wall hangings.
Cut Yarn to Uniform Length
Consistent yarn length ensures even texture and smooth knotting throughout your rug.
Bundle and Cut for Latch Hooking
Start by wrapping yarn around a cardboard scrap about 10 to 12 inches wide. Do this approximately 100 times to create a substantial bundle. Tie the bundle at both ends with scrap yarn to hold it together. Cut one side of the loops to release 100 or more equal-length strands.
Use a ruler to mark your cardboard for ideal strand length. Six to eight inches works best for most moss rugs.
Create Hand-Sewn Tufts
For hand-sewn patches, wrap yarn around four fingers 15 to 20 times. Slide the loop off carefully. Cut one end to create a fluffy tuft. Use immediately or store in labeled bags by color for later.
These tufts become individual moss clumps sewn directly onto your fabric base.
Master Latch Hook Knots
Latch hooking is the core technique in most moss rug kits. It’s quick, secure, and perfect for dense coverage.
Use the Loop-and-Wrap Method
This beginner-friendly technique locks yarn in place with a reliable knot. Fold two strands of milk-cotton yarn in half to form a loop. Insert the latch hook into the loop. Push the hook from front to back through a mesh hole. Wrap the loose ends over the open hook. Pull the hook back. The latch closes and pulls the knot tight.
Repeat across the grid. This method is fast and creates a plush, uniform base.
Try the Hook-First Loop Technique
For more control during detailed work, try this alternative approach. Push the latch hook through the mesh first. Use it to catch a pre-made yarn loop. Pull the loop through. Wrap the ends over the latch. Pull back to tighten.
Use this technique for detailed areas or when switching colors frequently.
Don’t pull too tight. Yarn should lie flat without puckering the canvas.
Build Gradient Effects
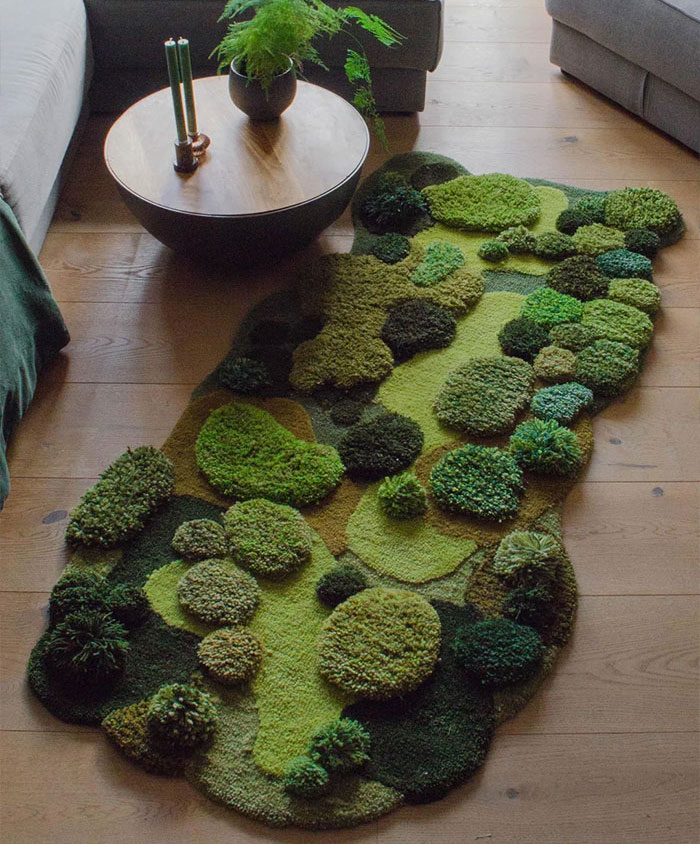
Gradients mimic sunlight filtering through trees or moss growing from light to shadow. They add depth and natural beauty to your rug.
Plan a Color Transition
Choose two base colors such as cream and sage green. Blend them across 5 to 10 columns for a smooth transition.
Example. Forest Floor Gradient shows how to mix colors across sections. Columns 1 and 2 use 100% cream. Columns 3 and 4 use 3 cream to 1 green. Columns 5 and 6 use 2 cream to 2 green. Columns 7 and 8 use 1 cream to 3 green. Columns 9 and 10 use 100% green.
Work row by row, mixing strands before hooking.
Apply Mohair for Soft Blending
Use four strands of mohair per grid for a feathery effect. After knotting, brush gently with a pet slicker brush or wide-tooth comb. Fluff fibers to blur color lines and enhance the natural fade.
Keep a small labeled chart nearby to track your gradient pattern as you work.
Crochet Faux-Fur Yarn for Plush Texture
Faux-fur yarn adds dimension and mimics thick moss beds or animal fur.
Attach Row by Row
Insert the latch hook between two adjacent grids, not through a hole. Pull a yarn strand through, leaving a 2-inch tail on the back. Move the hook 1 to 2 grids forward. Catch the yarn and pull through the mesh and the loop. Slide the loop onto the hook shaft and adjust tension. Repeat, creating a crocheted chain across the row.
This method prevents bald spots and gives a continuous, shaggy texture.
Outline Shapes First
For animal silhouettes or hills, use dark yarn to trace the outline first. Fill in with faux-fur rows for controlled coverage. Trim excess for clean edges.
Make and Attach 3D Pom-Poms
Pom-poms simulate moss lumps, lichen clusters, or wildflower heads. They add that crucial three-dimensional quality.
Use a Pom-Pom Maker
Open the donut-shaped tool. Wrap yarn densely around both sides. Cut along the outer edge. Tie a strong knot through the center gap. Remove the tool and trim for roundness.
Mix two colors while wrapping for variegated pom-poms.
Hand-Make Pom-Poms (No Tool)
Wrap yarn around your hand 150 or more times. Slide off carefully. Tie tightly in the middle. Cut both ends. Fluff and trim evenly.
Attach by threading the tail through the canvas and tying a double knot on the back.
Cluster Pom-Poms for Impact
Group three pom-poms together for a natural, scattered look. Pull the first through a mesh hole. Use the latch hook to pull it through a second hole 2 to 3 grids away. Repeat with the third. Wrap the final loop around a pom-pom end to lock the cluster.
This creates a natural appearance, like moss growing in patches.
Hand-Sew a No-Kit Moss Rug
No mesh or hook? No problem. Create a moss rug using only fabric and yarn.
Outline the Rug Shape
Cut canvas or felt into your desired shape such as oval, leaf, or cloud. Use contrasting yarn to stitch around the edge. This boundary guides your filling and prevents overhang.
Fill With Fluffy Yarn
Apply hot glue to a small section of the base. Press a tuft of yarn into the glue. Repeat, slightly overlapping tufts. Work in rows from one edge to the other.
Glue speeds up the process and secures loose ends effectively.
Sew Moss Patches for Durability
For long-lasting rugs, place a yarn tuft on the fabric. Sew a horizontal stitch across its base. Add 1 to 2 vertical stitches through the center. Knot and trim the thread on the back.
This method withstands foot traffic better than glue alone.
Add Realistic Texture and Depth
A flat rug looks fake. Real moss has variation. Use these techniques to mimic nature authentically.
Mix Yarn Lengths
Short strands of 3 to 4 inches create trimmed grass or flat moss. Long strands of 6 to 8 inches create wild moss or lichen trails. Vary lengths within sections for a grown-in, natural look.
Layer Colors Strategically
Use 3 to 5 colors maximum to avoid chaos. Your base should be medium green. Use dark green or brown for shadows. Add lime or yellow for highlights. Dab pink, lavender, or cream sparingly for flowers.
Sketch a Loose Guide
Lightly draw shapes with chalk or washable marker. Use simple forms like circles for pebbles, swirls for vines, and blobs for moss clumps. Let yarn texture soften the lines. Perfection isn’t the goal.
Nature isn’t symmetrical. Slight imperfections add authenticity.
Finish With Brushing and Backing
The final steps ensure safety, durability, and a polished look.
Brush and Trim for Fluff
Go over the entire rug with a pet slicker brush. Fluff mohair and tease out pom-poms. Use sharp scissors to trim stray or uneven strands.
Hold scissors at an angle for a natural, uneven cut. Never make it too neat.
Secure the Back
For latch-hooked rugs, cut non-slip backing to size. Attach with fabric glue or needle and thread. Cover the entire underside to prevent slipping.
For hand-sewn rugs, flip and inspect the back. Seal loose ends with hot glue or Mod Podge. Let dry completely before use.
Trim the Edges Cleanly
Leave a half-inch fabric margin beyond the yarn. Once backing is secure, trim excess. Gently push yarn aside with scissors to avoid cutting it.
A clean edge makes your rug look store-bought.
Customize Your Design

Make your moss rug uniquely yours with personalized motifs and themes.
Try Nature-Inspired Themes
Lavender Fields uses purple, soft green, and cream. Ocean Floor features aqua, sand, and deep blue swirls. Forest Floor combines mixed greens with brown dirt patches and yellow sunbeams. Wildflower Meadow starts with a green base and adds pink, yellow, and white pom-poms.
Use Simple Shapes
You don’t need artistic talent. Effective motifs include round clusters of brown yarn for pebbles, teardrop shapes with green gradients for leaves, curved rows of fading green for hills, and wavy blue yarn lines with green banks for rivers.
Sketch Digitally or on Paper
Doodle on paper with colored pencils. Use MS Paint or Canva to block color zones. Print and place under mesh as a guide.
Start small. Customize just one corner before committing to a full design.
Troubleshoot Common Issues
Avoid frustration with these quick fixes.
Yarn Puckers the Canvas
This happens when knots are pulled too tight. Loosen your tension. Yarn should lie flat, not stretch the mesh.
Colors Look Muddy
Too many shades mixed together causes this problem. Stick to 3 to 4 colors. Use one as dominant at 70%, with others as accents.
Pom-Poms Fall Out
Weak knots or short tails cause this issue. Use double knots and leave 3-inch tails when attaching.
Back Feels Scratchy
Exposed yarn ends or stiff canvas cause discomfort. Glue a soft felt backing over the entire underside.
How Long Does It Take
Time varies by size and detail level. A 20 by 30 inch rug takes 20 to 30 hours over several weeks. A large 3 by 5 foot rug requires 80 or more hours, spread over months.
Work in 30-minute sessions. Crafting should be relaxing, not rushed.
Frequently Asked Questions About Making a Moss Rug
Can I Use Real Moss on My Rug
No. Real moss dries out, turns brown, and can harbor mold. Yarn is durable, washable, and pet-safe. It mimics the look without the maintenance problems.
Is Glue Necessary When Making a Moss Rug
Glue is only necessary in hand-sewn or no-kit methods. Latch hook knots are self-securing and hold up well without adhesive.
Can I Wash My Moss Rug
Spot clean only. Blot spills with a damp cloth. Never machine wash. Water loosens knots and felts yarn, destroying your hard work.
Can Kids Make a Moss Rug
Yes. Use large grids and simple shapes. Supervise scissors and hot glue. It’s a great family project.
Where Can I Use a Moss Rug
Use them in bedrooms for soft underfoot comfort. They’re perfect for nurseries as sensory play surfaces. Add them to reading nooks for a cozy vibe. Create lightweight versions for wall hangings.
Avoid high-moisture areas like bathrooms.
Final Thoughts on Creating Your Moss Rug
A moss rug isn’t about perfection. It’s about capturing the quiet beauty of nature in a usable, handmade form. With the right yarn, a few simple tools, and a willingness to experiment, you can craft a floor piece that feels alive.
Key elements for success include using layered textures with short, long, fluffy, and lumpy yarns. Limit your color palette for harmony. Sketch loosely to guide your work without constraining creativity. Most importantly, enjoy the process. The tactile experience is part of the reward.
Start small, embrace the mess, and let your rug grow wild. Whether you follow a kit or invent your own design, every knot brings you closer to a handmade haven.







